6 OBS Features You Must Take Advantage of Today!
OBS Studio is one of the most popular broadcasting tools used by streamers worldwide. It helps you interact with your audience live on platforms such as Twitch, YouTube, Facebook, etc.
In this article, we will cover 6 OBS features you should start using today to stream in an effective and engaging manner! Including Transition Effects, Replay Buffer, Instant Replay, etc.
What’s more? These OBS features are completely free!
Excited? Let’s dive right into the feature list.
6 OBS Features to Make your Life Easy
Top free features in OBS
Before we begin, please note, all the below features work on OBS Studio v 27+. Please upgrade to the latest version of OBS.
- Use transition effects to source elements on OBS
Need more transition effects? OBS got you covered. With this OBS feature, you can add a transition to each source when they appear on the screen.
You get the same transition effects that you get with Scene transitions. You can even add stinger transition to individual sources making your stream look more professional.
???? Select “Show Transition” or “Hide Transition” Feature in the Sources menu for transition effects to take place on toggling the source visibility
How to set Transition Effect to source elements?
Setting transition effects to source elements is super simple. All you have to do is right-click on the desired source, select either “Show Transition” or “Hide Transition” to add a transition effect when you are showing or hiding the source.
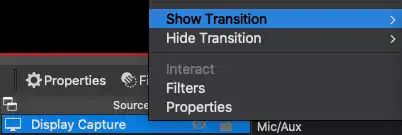
You get full access to all the transition options, including fade, swipe, slide, luma, or even a stinger transition. Now you can truly make your live stream look unique and more professional.
- Transition Override – Different Transition effect on Scenes
Tired of having the same transition effect when you switch from one scene to another in OBS? Now you can select different transition effects for different scenes.
For example, you can have one transition effect for your game and a different transition effect for your replays.
???? The Transition Override Feature allows you to override your default scene transition with another one
How to add Transition Override to scenes?
To add Transition Override, you need to right-click on the scene for which you want a different transition effect and select transition override. Now select your desired transition effect.

Now when you move from one scene to another, it will change as per your overridden transition.
- Nested Scenes
Managing your overlays and sources on scenes can be a difficult task. You can try to group complementary overlays together, for e.g. webcam, webcam border, alerts, and overlays. But if you want any change that reflects in all scenes at once, the groupings would not be useful and you would have to change each element in every scene one at a time.
???? A scene within another scene is called Nested Scene. The Nested Scenes Feature can help you save time and effort when you are trying to make changes that reflect in all scenes at once
How to add Nested Scenes?
Adding a Nested Scene is easier than it sounds.
- Create a scene with all sources which you want to repeat and group them together. The most commonly repeated elements are your Webcam, Webcam Border, Alerts, Stream info, etc.
- Go to a different scene where you want the group to be shown together
- Add (+) a source to the selected scene, select “Screen” and import the earlier scene into the selected screen
Benefits: Now to perform changes like changing your webcam settings, webcam border, etc. just go to the original scene created, change the desired source, and the changes are reflected in all scenes.
You can also assign a hotkey to the entire grouped scene for toggling visibility.
- Replay Buffer
Creating a compilation out of your stream is now a whole lot easier with the Replay Buffer Feature. OBS has a replay buffer button, which when pressed takes the last 10 seconds of your OBS output and saves it as a video file.
???? Replay Buffer Feature saves the last 10 seconds (time frame can be changed) of your stream as a video. You can customize the length of the video as well but it might impact your PC performance
You can also use this feature to show an instant replay of your stream while streaming.
This feature will save you more precious time than editing out the best parts of the full stream. You can just record small clips during the stream and create your clips with it. You can make a compilation, use the clips in guides, or record your participant’s reaction from your stream.
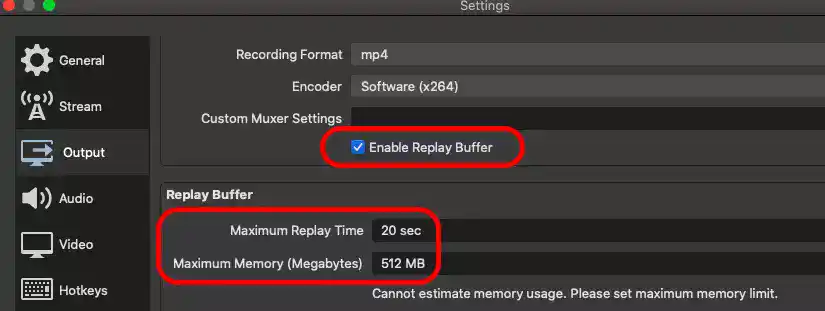
Do take care when changing the video length. It will eat into your memory, so check the memory spent to know how much your PC can handle.
How to make Replay Buffer active?
To keep the replay buffer active, follow the steps below:
- Go to Settings→ Output→ Enable Replay Buffer Set Maximum Replay time to the desired length of the replay video (10-20 sec) Ensure your PC is able to handle the load of a video buffer. Limit it to space in your RAM that you can spare. Trial and test for minimum impact to your stream.
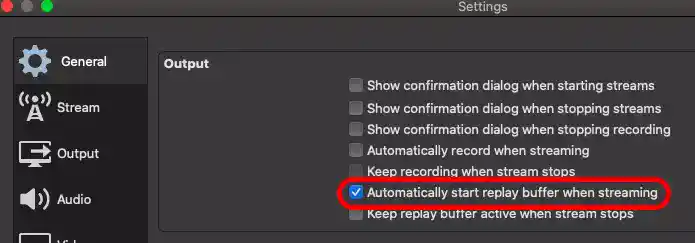
- Go to Settings→ General→ Click on “Automatically start replay buffer when streaming”
- Create a hotkey for saving the video (last 20 sec as set above) on demand Go to Settings→ Hotkey→ Save Replay Create a hotkey for that, which you can press immediately after the moment to record the last 20 seconds.

Now every time you press the hotkey (Shift+1), it will save the last 20 seconds of your stream in your recording folder. You can pick all your favorite moments and create a compilation.
How to set up Instant Replays while live streaming?
To show your replay while streaming you need to use an inbuilt script in OBS called “instant-replay.lua”. This script automatically picks the latest saved video in your instant replay folder.
You can then use a hotkey to run the script and show a replay on your scene.
- Save a clip using the hotkey made above for Save Replay
- Create a new Media Source in the scene, we can name it “Instant Replay”
- Add the latest saved replay video created to the Media Source (Instant Replay). The video will be saved in the folder mentioned in your recording path.
- Now Go to Tools→ Scripts→ Click the + icon to add the script “Instant-replay.lua”
- Click the “instant-replay.lua” script and select the media source (Instant Replay) created above
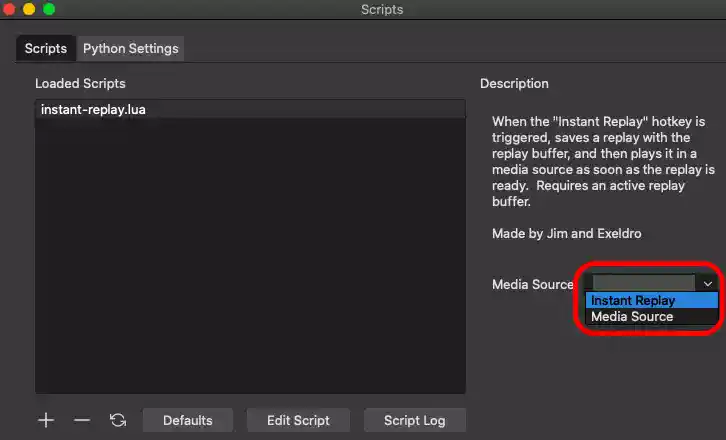
- Now you just need to add a hotkey to play the replay buffer. Go to Settings→ Hotkeys→ Instant Replay

To show instant replay on your live stream, Press Shift+1 to save the last 20-second replay and Press Shift+2 to show it.
- Separate Audio Tracks
You can use the Separate Audio Tracks feature to get full control over the audio of your stream. Record all your audio in separate tracks including your Discord audio, game audio, microphone audio, etc., and use them as needed. This feature is only helpful if you are recording your videos through OBS and wish to edit them later.
Your stream will have all the audio tracks playing as one and you can control them by toggling the mute switch for individual audio outputs.
???? Recording Audio into Separate Tracks feature allows you to edit each input separately and remove unwanted noise, copyrighted music, and increase or decrease the volume of tracks
Too many streams or videos have been ruined with screams, copyrighted music, or badly mixed audio levels.
The benefit of recording into separate tracks is when you edit your recordings, all your tracks will appear as individual streams. You can control individual volume, boost, mute, or fade separate tracks in your video to create that perfect stream.
For example, when streaming in OBS, you have multiple audio outputs coming over from different applications like your Discord server, your microphone audio, desktop audio, etc. If you record your audio tracks separately then you can mute/ fade one audio source or multiple, if people are speaking over each other or if there is any background noise.
How to create separate audio tracks?
Recording audio tracks in separate tracks can be done easily from the settings panel if you know which sources to capture separately.
- Go to Settings in OBS
- Select the Output tab in your Settings menu
- Go to the Recording tab in the Output menu
- Head over to the Audio Track section in the Recording tab (You will see numbers from 1-6, these are additional audio tracks that you can add)
- Tick the checkboxes against the numbers to add multiple audio tracks. (By default all your audio tracks are streaming through Audio Track 1, you will have to add tracks from 2 onwards)
???? Tick as many checkboxes as the number of audio tracks that you want to capture, starting from Audio Track 2
For example, Select Audio Track 2, 3, 4 if you have 3 outputs that you want to capture separately (1 is reserved for the combined audio track)
- Close the Settings panel and right-click inside the “Audio Mixer” section to select the “Advanced Audio Properties”
- Choose separate tracks for the different audio outputs, keeping Track 1 as checked for all sources, this would be your stream audio which is a combination of all audio tracks (Refer image where each audio source is going into Track 1 and one another track starting from Track 2)
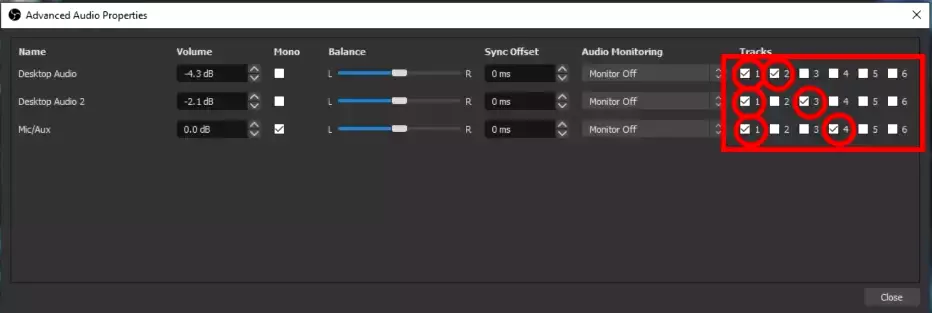
Now you have separate audio recordings for each source which you can manipulate as per your wish. These would now appear as separate sources when you are trying to edit the stream.
Check out the video below by CallumXGames to navigate and use this feature smoothly.
- Dock Webpages in your OBS panel
You can use the Dock Webpages in your OBS panel feature to monitor your feeds so that you don’t miss any new activity. This feature is similar to Streamlabs OBS where you can see docks for recent activity feeds.
???? Docks feature allows you to monitor all your activity feeds in your OBS panel and give you quick access.
All your pop-up webpages can be made as docks that fit inside your OBS panel so that your attention doesn’t divert. You do not have to look at multiple things which can be difficult to manage while streaming.
How to add web pages as Docks?
Go to the “View” menu in the top bar to see Docks as an option in the drop-down. Go inside Docks to find “Custom Browser Docks”.
You can add the Pop-up URL that you want as a dock in the dialog box and name it. Go ahead and select the custom dock created for it to appear.
If you log into Twitch in OBS you will see some added docks already in the “View” menu at the top bar. These may include Chat, Twitch Activity feed, Stats, etc. These are already custom docks created by OBS using your Twitch account so you don’t need to set them up. You can directly click on them to see the dock.
So,
Are you excited to try these OBS Features Out?
I’m sure you must be. OBS is a treasure trove of custom features to make your stream or video content turn out to be amazing. And that too, all for free! Hope you found these ideas useful in your journey, starting as a streamer using OBS.
Confused about using OBS vs Twitch Studio if you’re just starting out? Check out my article to understand the key differences and make your choice.
