Earned your affiliate status with Twitch and roaring to use Twitch’s emote features to engage with your chat in a new way?
You’ve come to the right place!
This article will guide both new and experienced streamers through the exciting process to create and set up Twitch emotes, a key element in building a vibrant community on Twitch.
We’ll walk you through every step, right from understanding emote criteria for affiliates, to designing emotes that resonate with your personal brand.
Learn about the technical requirements for emote sizes and formats, how to upload them, and approval process by Twitch.
Bonus! Special tips on how to effectively introduce these new emotes to your audience, to enhance viewer interaction and experience.
Whether you’re looking to express your channel’s unique vibe or aiming to increase viewer engagement, this guide is your go-to resource for all things related to Twitch emotes.
How to Setup Twitch Emotes
First you need to be an affiliate or a partner to upload emotes on Twitch. Ensure the emotes are less than 1 mb of size and represent your channel brand and personality. These emotes can be uploaded in your Twitch creator dashboard in the emote section.
Lets dive into the details of the steps involved to setup your emotes and understand the nitty grit-ties of emotes and tips for best practices.
Introduction to Twitch Emotes
What are Twitch Emotes?
Twitch Emotes are at the heart of interaction on Twitch. These small, digital expressions allow streamers and viewers to communicate in a unique, fun, and often humorous way, transcending the barriers of traditional text communication.
Twitch emotes are more than just images. They are a way for us to share laughs, reactions, and our unique personalities in real-time.
The Popularity and Impact of Emotes in Streaming
Emotes are like the universal language of Twitch. They bond the community together and let us share moments that go beyond words. It’s amazing how a simple image can represent an inside joke or a memorable stream moment.
Getting Started with Twitch Emotes
Understanding Twitch Affiliate and Partner Programs
To access custom emote slots, you’ll need to be part of Twitch’s Affiliate or Partner programs. These programs offer different levels of access based on your channel’s size and engagement.
Both Twitch Affiliates and Partners can create custom emotes for their channels. Partners have more slots, instant approval, and access to advanced features, reflecting their more established presence on the platform. Affiliates, although starting with fewer privileges, can build their way up by growing their subscriber base.
Twitch Affiliate Program Custom Emotes:
- Few Emote Slots:
Affiliates have fewer emote slots compared to Partners. Initially, Affiliates get access to one emote slot for each subscriber tier (Tier 1, Tier 2, and Tier 3). - Basic Customization:
Affiliates can upload their custom emotes, which subscribers can use across Twitch. These emotes are basic but still offer a degree of personalization for the channel. - Emote Approval:
Emotes uploaded by Affiliates require Twitch’s approval. This process can take some time, depending on Twitch’s review queue.
Twitch Partner Program Custom Emotes:
- More Emote Slots:
Partners start with more emote slots than Affiliates, reflecting their long experience on the platform. They also have the opportunity to unlock more slots than Affiliates, based on the number of subscriber points. - Instant Emote Approval:
One advantage for Partners is instant emote approval. Partners can upload and change emotes without waiting for Twitch’s approval, allowing for more flexibility and immediacy in updating channel content. - Access to Exclusive Emote Features:
Twitch often rolls out new features and beta tests related to emotes, and Partners typically get first access to these updates. This includes things like animated emotes or special event-based emotes.
Designing Your Twitch Emotes
Creative Ideas for Emotes
Emotes should represent your brand and personality. Think about inside jokes, common phrases, or unique aspects of your channel that could translate into a fun emote.


Design Tools and Software Recommendations
Various tools can be used to design emotes, from Adobe Photoshop to free online platforms like Canva. Choose a tool that can help you get started quickly, matching your skill level and design needs.
Below are some popular emote making websites.
- Canva’s Free Twitch Emote Maker: Canva offers a user-friendly platform for creating Twitch emotes. It’s suitable for both beginners and seasoned designers.
- Kapwing Custom Emoji Maker: Kapwing provides a free platform with variety of tools including image overlays, emojis, stock assets, and templates.
- Fotor’s Free Twitch Emote Maker: Fotor allows you to create emotes for Twitch with an array of templates to choose from. The platform also includes features like AI tools, background remover, and various templates for social media.
- EmoteMaker.ai: EmoteMaker.ai is an AI-powered tool for crafting emotes. The platform promises AI precision and is user-friendly for all skill levels.
Twitch Emote Guidelines and Sizes
Twitch’s Acceptable Content Policy for Emotes
Twitch has strict guidelines for emotes to maintain a respectful and safe environment. Twitch’s Acceptable Content Policy for emotes mandates that they must not include offensive, infringing, or hateful content. Emotes should avoid explicit imagery, harassment, or violations of intellectual property rights.
Size and Format Specifications
Emotes need to be uploaded in specific sizes and formats. Typically, Twitch requires three sizes for each emote: 28×28, 56×56, and 112×112 pixels, in PNG format.
Upload and Setup Twitch Emotes
Step-by-Step Guide on Uploading
Once your emotes are designed and ready, you can upload them to Twitch through your dashboard. This process involves selecting the correct files and waiting for Twitch’s approval.
Step-by-Step Guide on Uploading Twitch Emotes
1. Ensure Eligibility for Uploading Emotes:
Before you can upload emotes, make sure you are a Twitch Affiliate or Partner. This status is essential as it grants you the ability to add custom emotes to your channel.
2. Prepare Your Emotes:
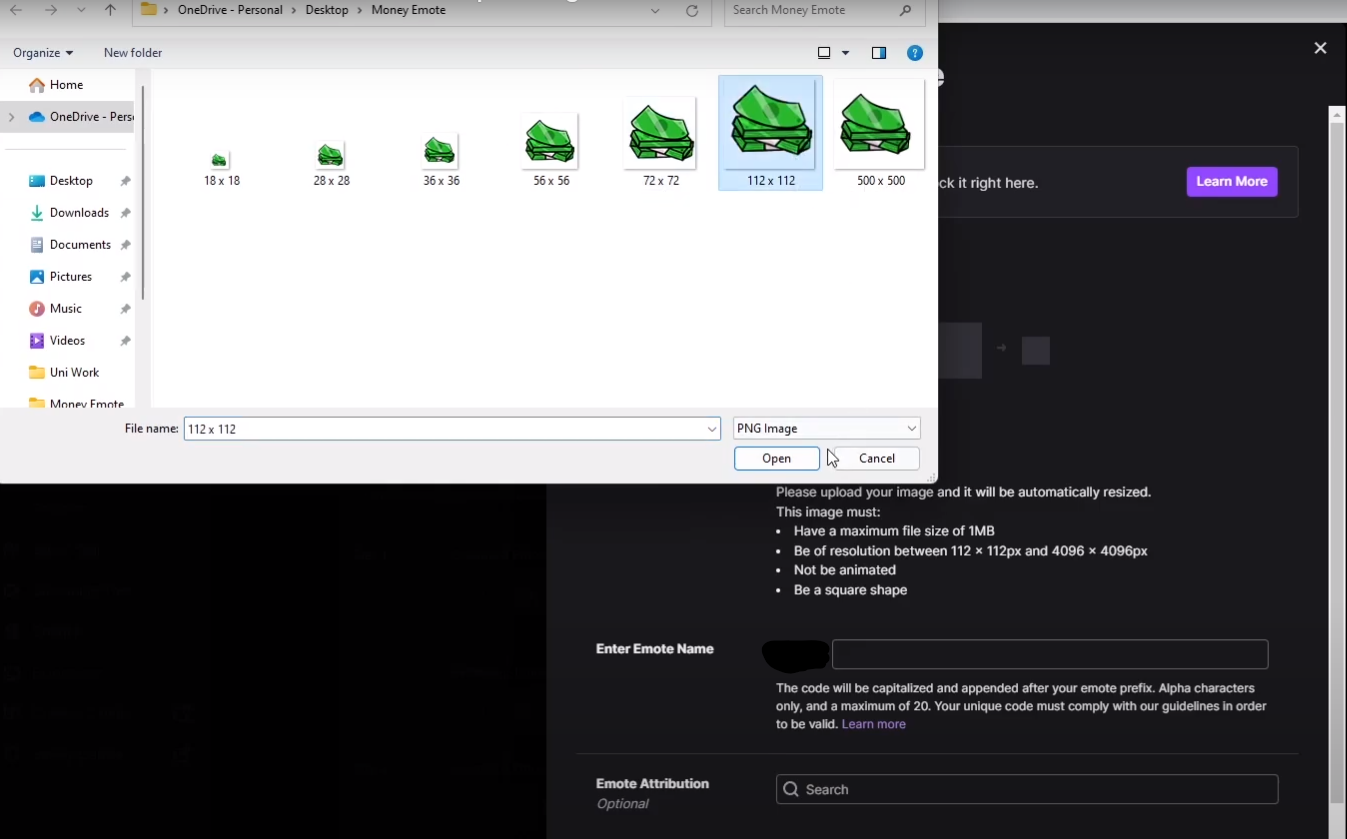
- Have your emotes ready in the required sizes: 28×28, 56×56, and 112×112 pixels. Note that they must be square shape (same pixel height and width)
- In case you do not have the emote in all sizes, Twitch also has a auto-resize option to resize your image automatically
- Ensure they are in PNG format with a transparent background and the file size do not exceed 1MB
- Check that the emotes comply with Twitch’s Community Guidelines and Terms of Service.


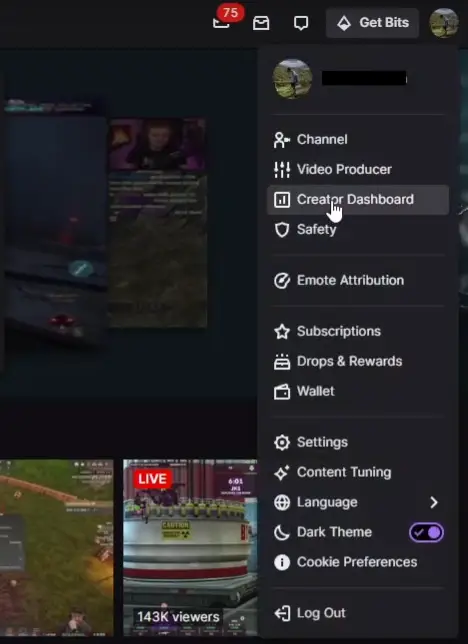
3. Go to the Twitch Dashboard:
- Log in to your Twitch account
- Click on your profile icon at the top right corner of the Twitch homepage
- Select “Creator Dashboard” from the dropdown menu
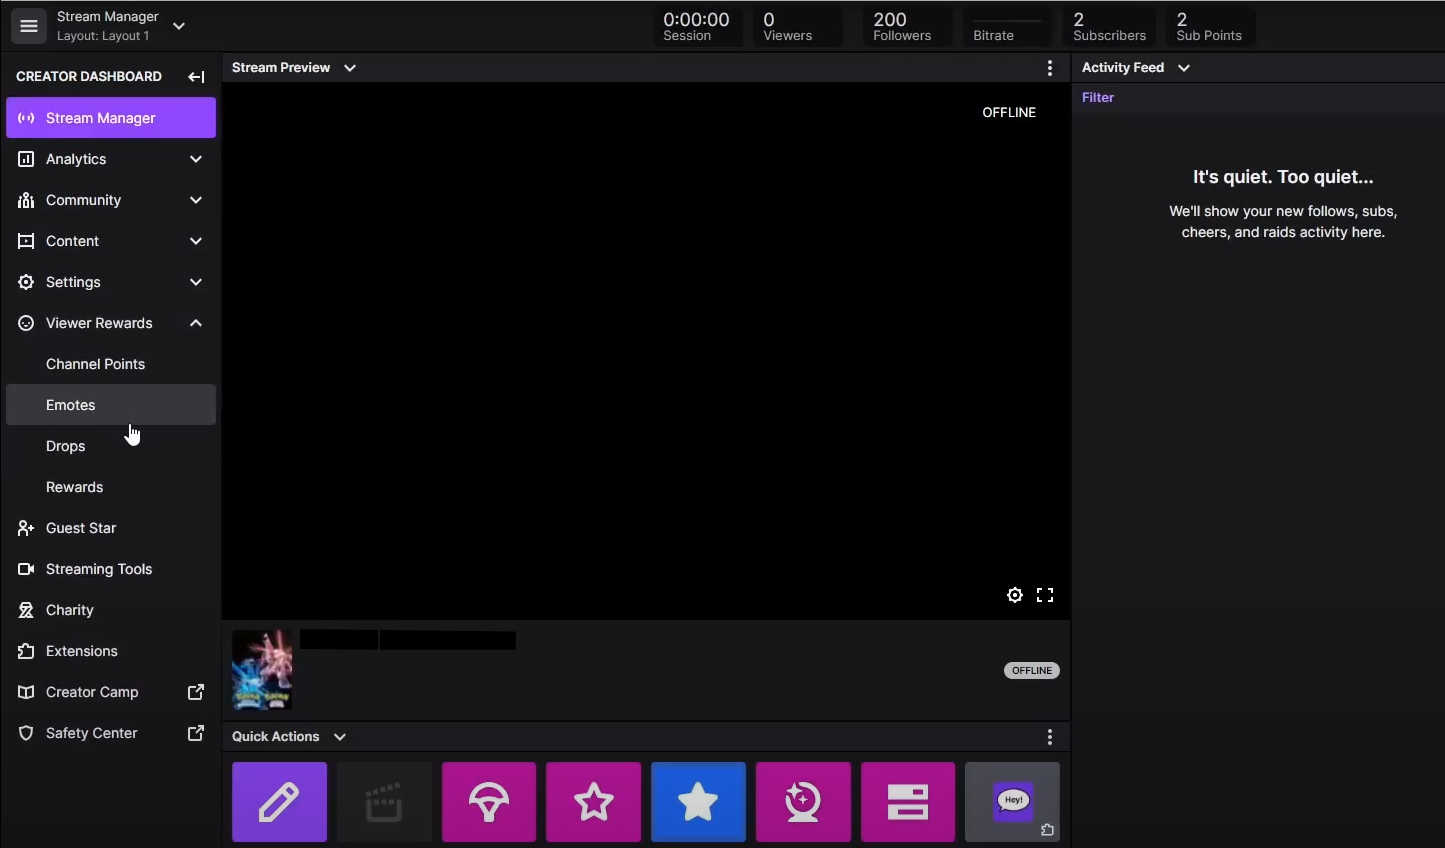
4. Navigate to the Emote Settings:
- In the Creator Dashboard, find the “Viewer Rewards” tab on the left sidebar
- Scroll to the “Emotes” section
5. Uploading the Emotes:
- In the Emotes section, you will see different tiers: Tier 1, Tier 2, and Tier 3. These correspond to the different subscription levels available for your subscribers
- Choose the tier for which you want to upload the emote
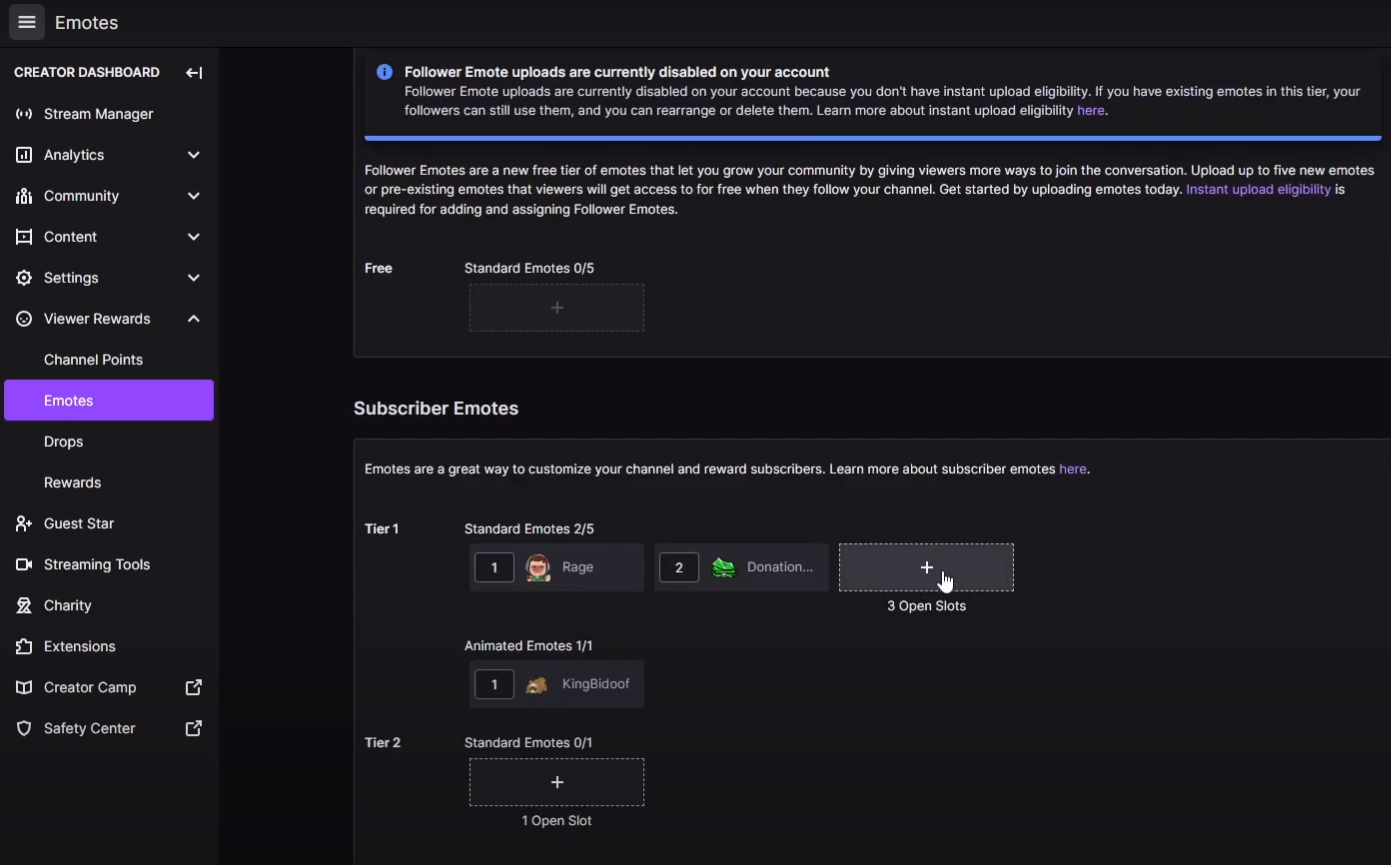
- Click on the open slot to insert your Twitch emote
- You’ll be prompted to upload three files for each emote (one for each size: 28×28, 56×56, and 112×112 pixels). You can use the Auto-resize toggle to resize your emote automatically
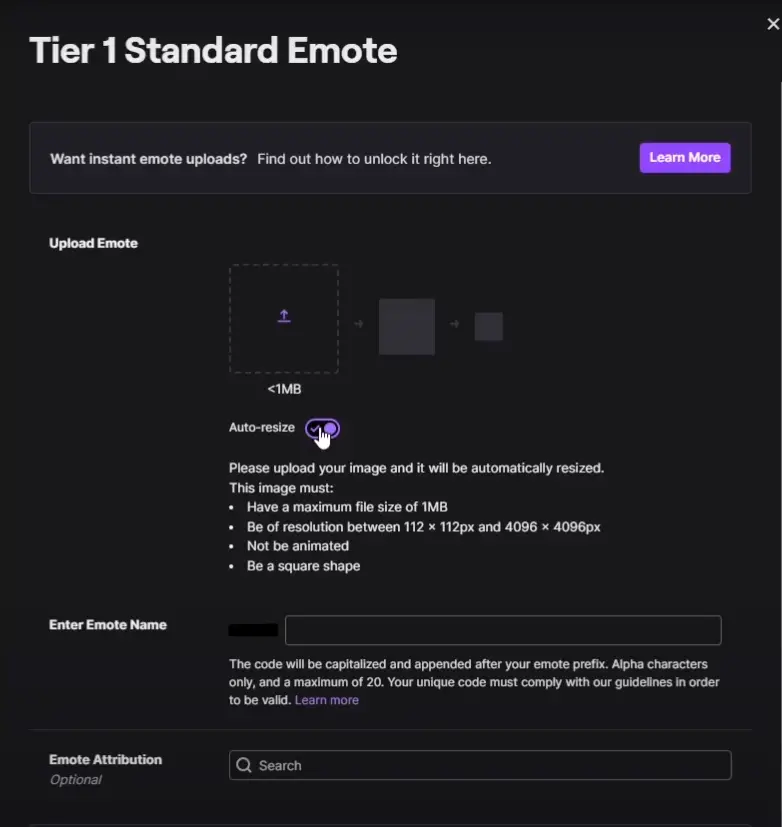
- Upload the corresponding files for each size
- After uploading, enter an Emote Name for the emote. This code is what viewers will type to use the emote in chat
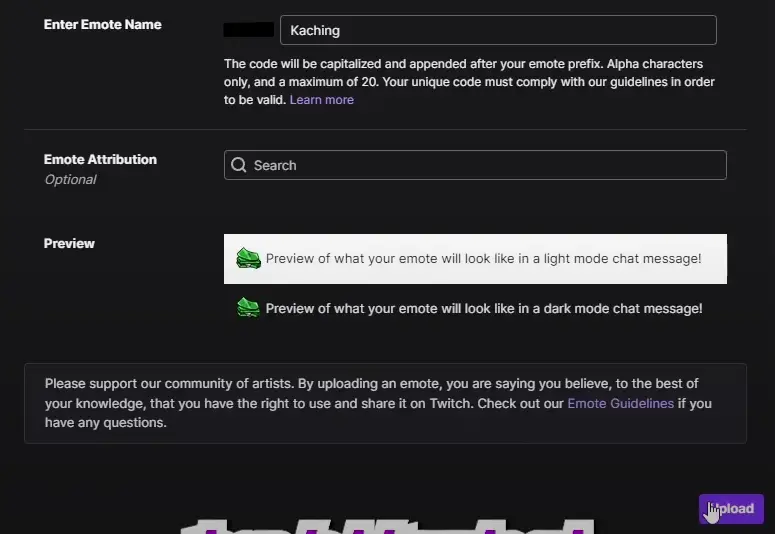
6. Submit for Approval:
- Once you’ve uploaded the emotes and added the codes, submit them for Twitch’s approval
- Twitch will then review your emotes to ensure they adhere to the platform’s content guidelines
7. Wait for Approval:
- Approval times can vary, ranging from a few hours to several days
- Once approved, Twitch will notify you, and your emotes will be available for use by your subscribers
8. Managing Your Emotes:
- After approval, you can manage your emotes in the Emotes section
- Here, you can replace, remove, or add new emotes
- Keep an eye out for your subscribers’ preferences and feedback to ensure your emotes remain engaging and relevant
What Types of Twitch Emotes are Seen on Twitch?
- Global Emotes: These are emotes that anyone on Twitch can use. They include famous ones like Kappa (for sarcasm or trolling), PogChamp (for excitement), and ResidentSleeper (for boredom)
- Subscriber Emotes: Streamers can offer custom emotes as a perk for their subscribers. These emotes are unique to each channel and often feature inside jokes, references to the streamer, or themes relevant to their community
- BTTV (Better Twitch TV) and FFZ (FrankerFaceZ) Emotes: These are third-party extensions that allow viewers and streamers to use and create additional emotes not officially supported by Twitch. They’re very popular in the community for the extra layer of creativity they bring
- Animated Emotes: Twitch has introduced animated emotes, allowing for more dynamic and engaging expressions. These can be global, subscriber, or third-party emotes
- Event-Specific Emotes: During special events or promotions, Twitch often releases temporary emotes. These can be tied to specific events like Twitch Rivals, charity streams, or holidays
- Tier-Specific Emotes: Higher subscription tiers (Tier 2 and Tier 3) often have exclusive emotes, giving subscribers at these levels something extra for their support
- Cheer Emotes: When viewers use Bits (Twitch’s virtual currency) to cheer in chat, they can use special emotes that often animate and show the amount of Bits used
- Custom Emote Creators: You can also commission artists to create unique emotes that reflect their brand or community culture
Exploring and Creating Free vs. Paid Twitch Emotes
Using Popular Platforms for Free Emotes
You can use platforms like BTTV, FrankerFaceZ or 7Tv that offer free emotes. But remember, these platforms might be used by multiple streamers, reducing their uniqueness.
Related Article: 7TV Emotes for Twitch and YouTube – 200 Free Emote Slots and More!
Finding and Hiring an Emote Artist for Paid Twitch Emotes
If you’re not a designer, you can consider hiring a professional. Platforms like Fiverr, Etsy or X (Twitter) are great places to find talented emote artists
When working with an artist, communicate your vision clearly, provide feedback, and respect their creative process and pricing.
Pros and Cons of Free vs Paid Twitch Emotes
While free emotes can be a great starting point, custom and paid emotes offer uniqueness and personalization, enhancing your brand identity on Twitch. As you grow your subscriber base, you can move from Free to Paid Twitch Emotes to build an Emote relatability with your channel
Bonus! Tips and Best Practices for using Emotes to grow your channel
- Enhance your Viewer Engagement with Emotes
- Encourage viewers to use your emotes by incorporating them into your stream, offering subscriber-only emotes, and creating emote-based games or challenges
- Use your emotes to foster a sense of belonging and identity among your viewers, creating a more engaged and loyal community
- Monetize Your Twitch Emotes
- Offer exclusive emotes to your subscribers at a cost. It is a great way to monetize your channel while providing value to your audience
- Integrate Interactive Features with Twitch Emotes in Streams
- Use Twitch Bits to create interactive experiences with emotes, like triggering on-screen effects or sounds with specific emotes
- Leverage Twitch extensions that allow viewers to use emotes in interactive ways, enhancing the overall streaming experience
- Use emotes to create interactive elements in your streams, like emote polls or reactions. This would not only make your stream more engaging but would also encourage viewers to use and interact more with your emotes
- Interpreting Twitch Emote Analytics for Growth
- Utilize Twitch analytics to track which emotes are most popular and how they’re being used. This data can inform your decisions about which emotes to keep, modify, or retire
- Get insights into viewer preferences and engagement patterns. This would help you refine your streaming strategy and community engagement
- Promoting Your Twitch Emotes
- Promote your emotes on social media, on your Twitch channel, and through collaborations with other streamers to increase visibility and usage
- Use platforms like Twitter, Instagram, or TikTok to showcase your emotes, sharing stories or posts that feature them in a creative context
- Use Emote for Brand Identity
- Align your emotes with your channel’s brand and personality, reinforcing the unique identity and style of your Twitch presence
- Ensure that your emotes are consistent with the branding you have on your other platforms, creating a cohesive brand experience for your audience
- Avoid Copyright Issues
- Be aware of copyright laws when creating emotes. Avoid using copyrighted material without permission to prevent legal issues and Twitch policy violations
- If in doubt, consult with legal experts or use original artwork to avoid potential copyright infringements
- Adjust Emotes Based on Community Response
- Regularly seek feedback from your community on your emotes. Their insights can be invaluable in creating emotes that resonate with your audience
- Keep making changes to your emotes based on viewer feedback, ensuring they remain relevant and appealing to your community
- Updating and Evolving Your Twitch Emotes
- Periodically review and update your emotes to keep them fresh, relevant, and in line with any changes in your channel or community
- Be in tune with trends and feedback, adapting your emotes to reflect current interests and community dynamics
- Avoid common pitfalls like overly complex designs, insensitive content, or sometimes even overlooking or ignoring viewer preferences and feedback
FAQs
What are the size requirements for Twitch emotes?
Twitch requires emotes in three sizes: 28×28, 56×56, and 112×112 pixels, in PNG format.
Can I use copyrighted material in my Twitch emotes?
It’s best to avoid using copyrighted material without permission to prevent legal issues and Twitch policy violations.
How can I encourage viewers to use my Twitch emotes?
Integrate emotes into your stream, offer subscriber-only emotes, and create emote-based interactive experiences.
Where can I find artists to design custom Twitch emotes?
Look for emote artists on platforms like Fiverr, Twitter, or artist communities on Discord. Always review their portfolios to ensure their style aligns with your vision
How do I upload and manage my Twitch emotes?
You can upload emotes through your Twitch dashboard. Ensure they meet size and format requirements and organize them effectively for easy management.
What should I do if my Twitch emote is not approved?
Review Twitch’s guidelines to identify the issue, make necessary adjustments, and resubmit the emote for approval.
In Closing, Remember to Enjoy the Process!
Setting up Twitch emotes is a creative process that enhances your streaming experience and strengthens community engagement. By following the steps outlined in this guide, you can create unique, engaging, and effective emotes that resonate with your audience. Remember to stay authentic, keep abreast of trends, and continuously engage with your community for feedback and ideas. Happy streaming!
