Hey there, friends!
Have you ever watched your favorite fellow streamers play games on Twitch and seen cool little pictures or sounds pop up when someone new follows them or gives them a gift? These are called alerts, which are fun little “thank-you” for their awesome viewers.
Looking for ways to set Twitch Alerts up for your stream too?
In this article, I’m going to show you how to setup Twitch alerts for followers, gifts, and other fun things on Twitch. And guess what? It’s super easy and quick – we can do it in less than 10 minutes! So, get ready to make your Twitch channel super cool and thank your friends in a fun way when they watch you play!
Step-by-Step Guide to Set Up Twitch Alerts from your Twitch Dashboard
Setting up Twitch alerts can enhance your streaming experience by engaging your viewers.
The Twitch Alerts setup process is free, works with OBS, Streamlabs, and Twitch Studio, and doesn’t require any third-party tools as it’s integrated into Twitch. This guide simplifies the process, allowing you to set up various alerts in under 10 minutes.
1. Go to Twitch Dashboard and Find Alerts Tool
- Open Twitch: Start by logging into your Twitch account.
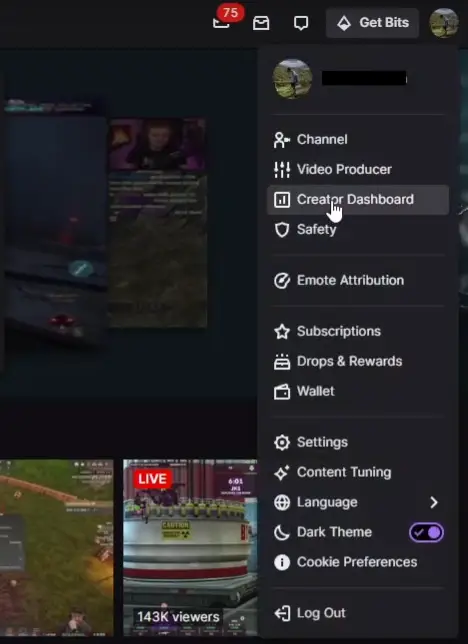
- Navigate to Dashboard: Click your profile picture and select ‘Creator Dashboard‘.
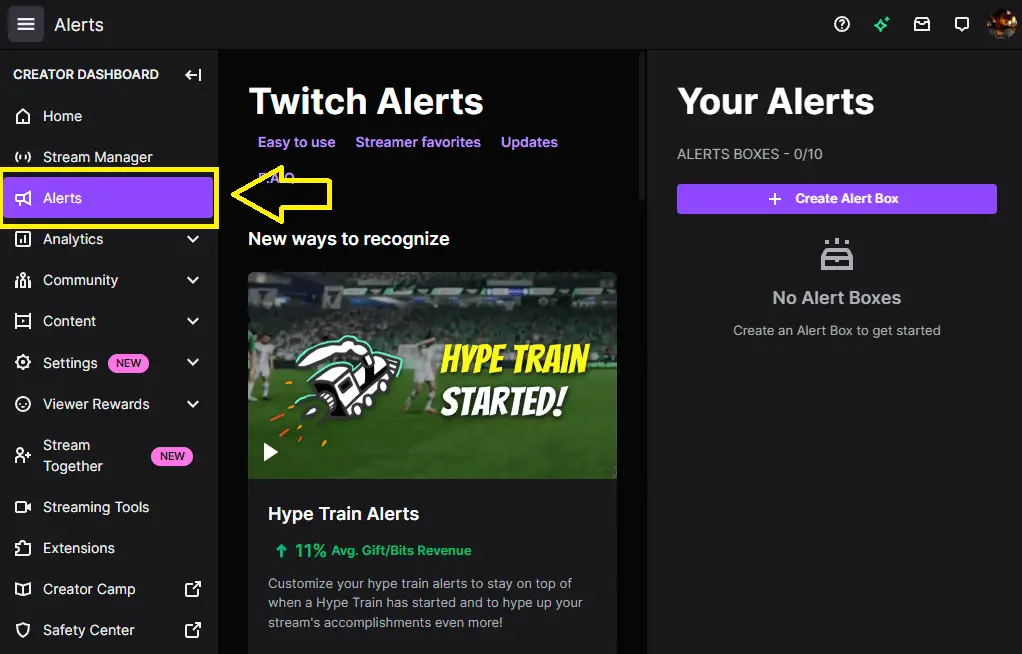
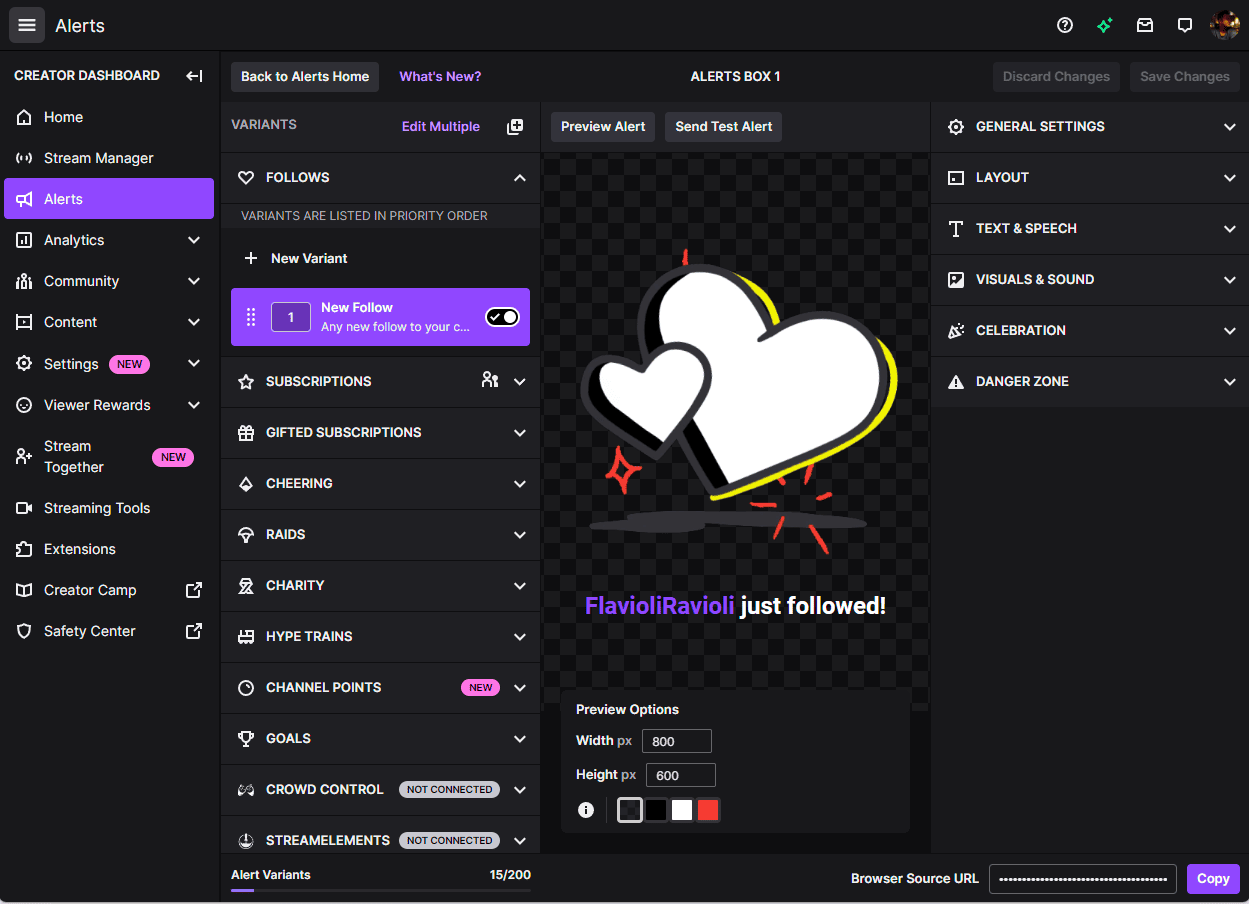
- Find the Alerts Tool: In your ‘Creator Dashboard’, find the Alerts section. It should be visible on the left side of your dashboard. If not, explore a bit since Twitch updates its UI occasionally.
2. Setup Twitch Alerts and Create an Alert Box
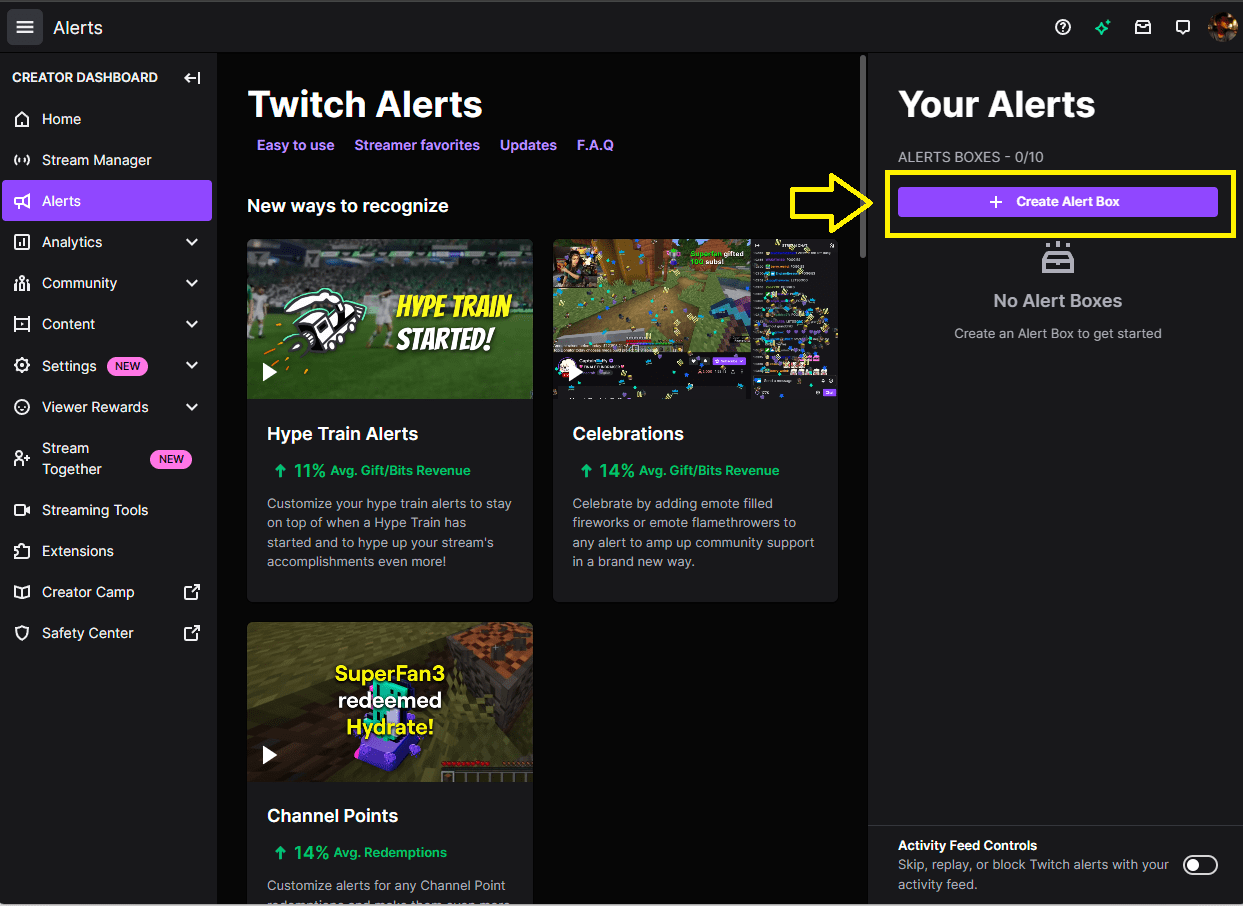
- Select ‘Create Alert Box’: Inside your Alerts section, click on “+ Create Alert Box”. It will directly take you to the alert edit page, where you can customize your alerts
- Find and Edit the Alert Box: Find the ‘FOLLOWS’ alert, you’ll initially see a “New Follow” alert under it. You can start customizing this here, but I would suggest to first test your alert with OBS and do the customization later.
- There are different alert types mentioned here e.g. ‘SUBSCRIPTIONS’, ‘CHEERING’, HYPE TRAINS’, ‘GOALS’ etc. The process for editing any of the events remains the same.
Related Article: How to setup Twitch Emotes
3. Add the Alert by Pasting the Browser Source URL to OBS or Streamlabs
- Open OBS or Streamlabs: Login to OBS or Streamlabs. Then, head to the scene where you want to add alerts
- Add Browser Source: Click the ‘+‘ or ‘Add Source‘ button. This would help you paste the URL link available on Twitch Alerts in the Creator Dashboard. I will explain how to locate this in Step 5
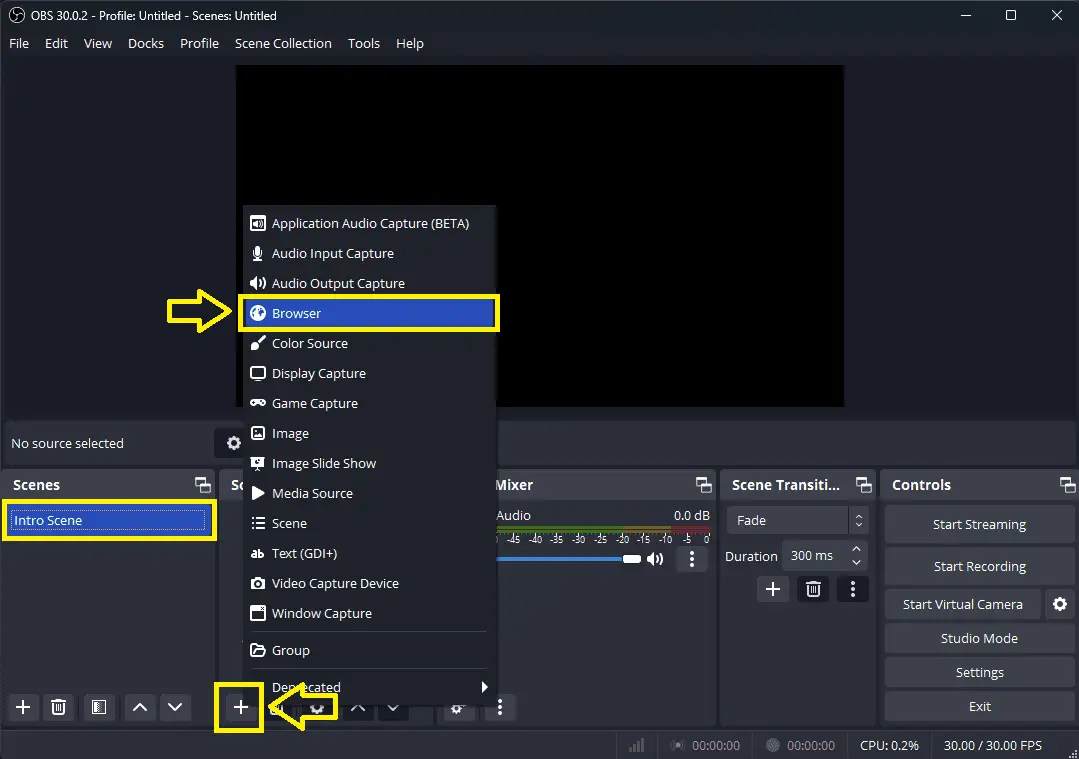
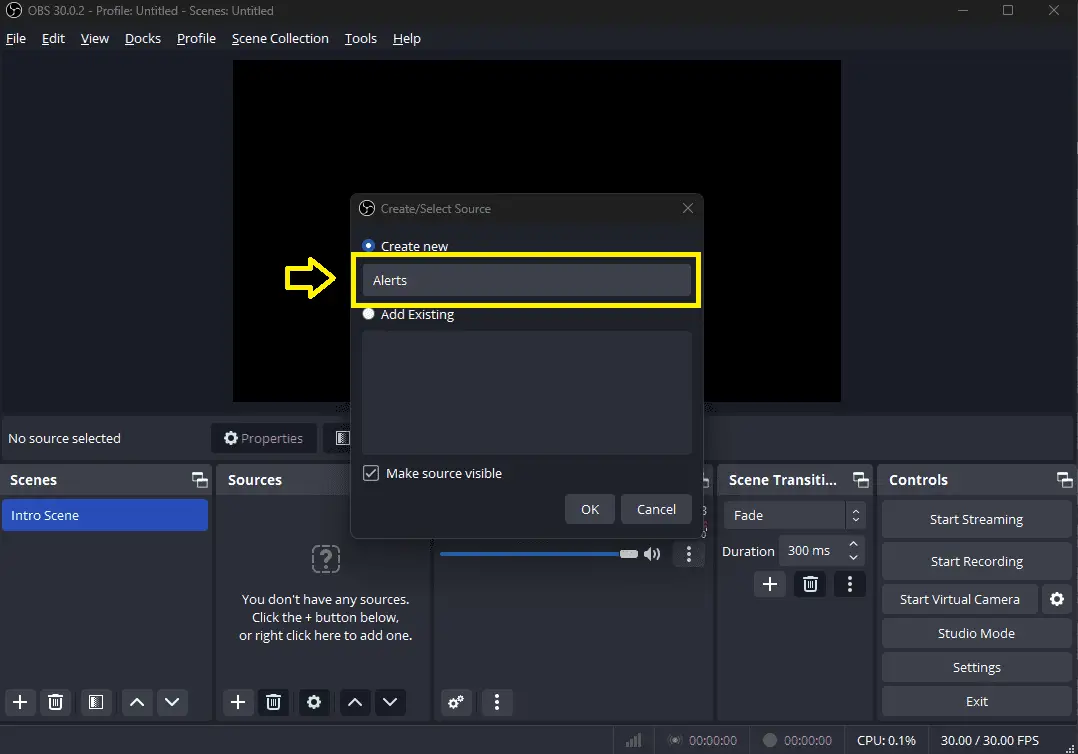
- Name the browser source e.g. ‘Alerts’ and confirm with ‘OK’.
- Adjust Default Settings: Compare the ‘Width’ and ‘Height’ dimension of the alert in the preview option of your Twitch Dashboard with your OBS browser source ‘Width’ and ‘Height’
- You should always match the size of the alerts (usually 800×600) in both cases. In case there is a difference, the alerts might appear compressed or elongated
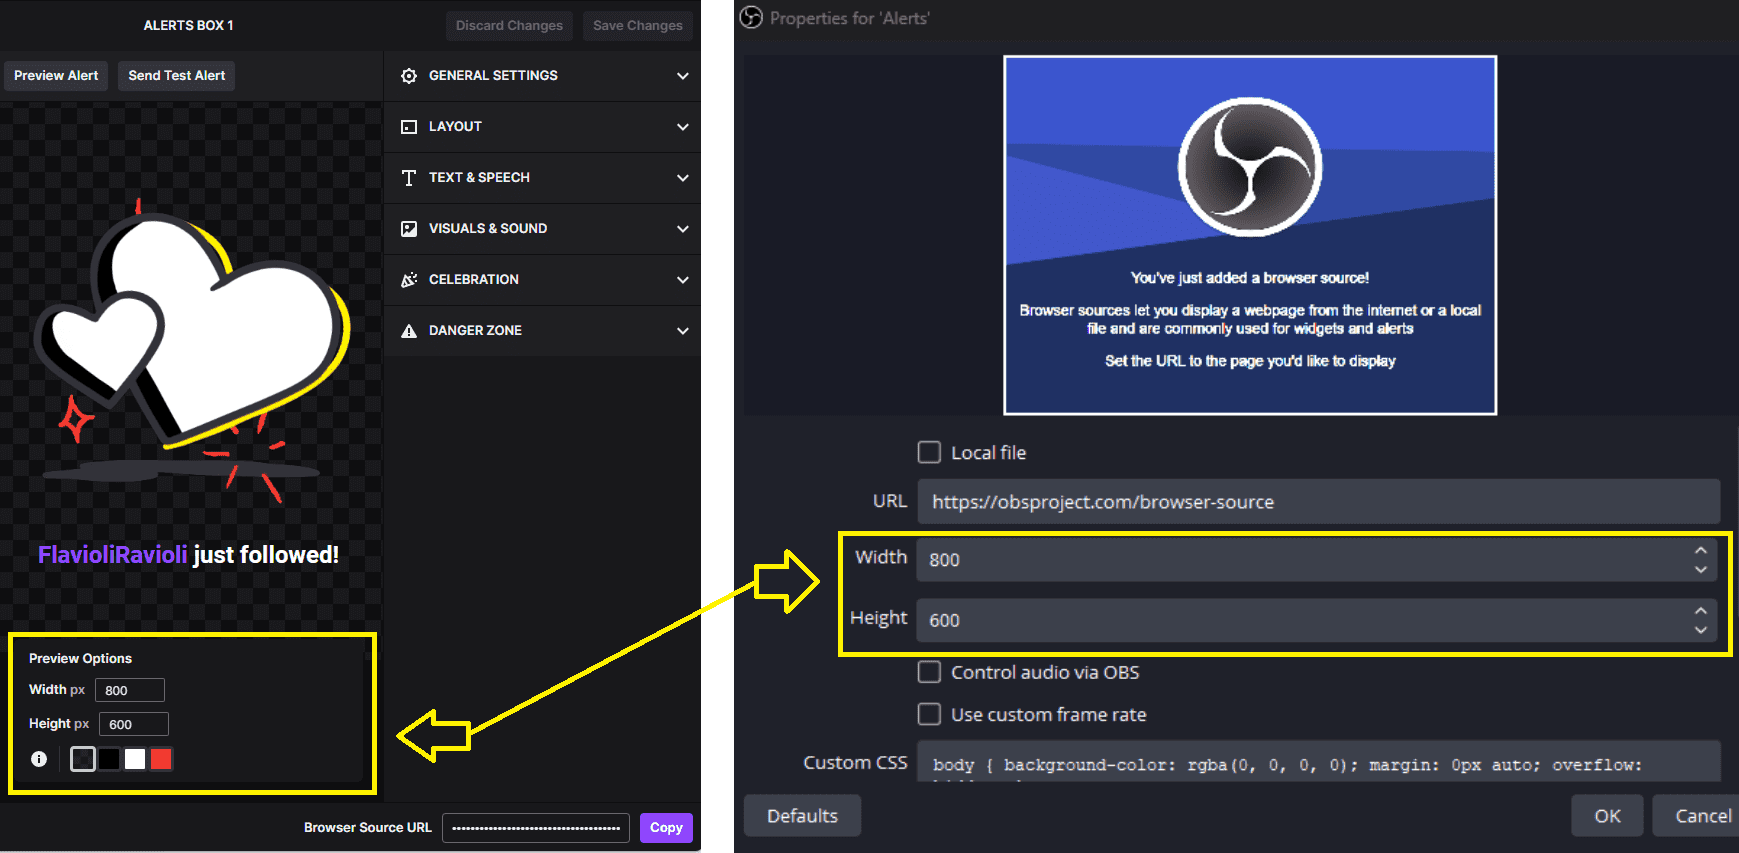
- Copy Browser Source URL: Go to your Twitch Alert dashboard and copy the ‘Browser Source URL’ from the bottom right corner of the alerts dashboard

- Paste URL in OBS/Streamlabs: In the properties box of OBS or Streamlabs, paste the copied URL and hit ‘OK’
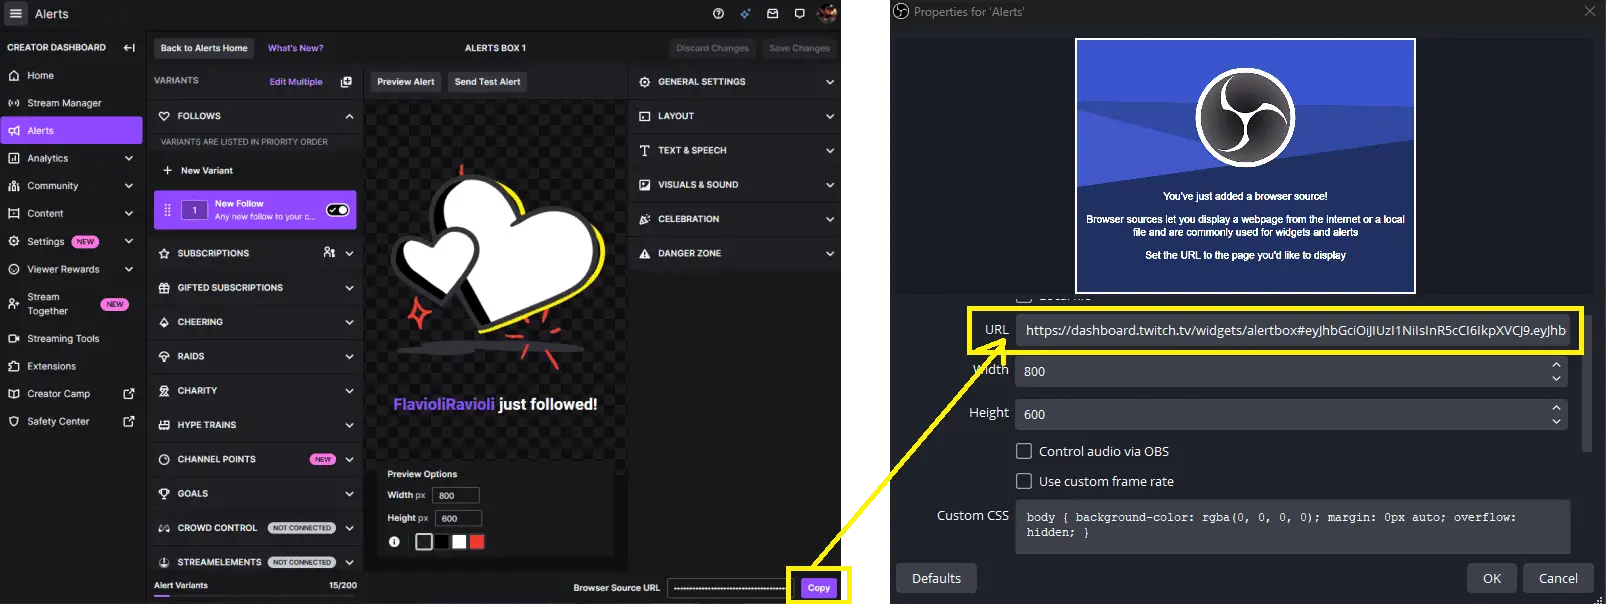
4. Test Alerts in OBS
- Send Test Alert: Go back to your Twitch Alert dashboard and click ‘Send Test Alert’.
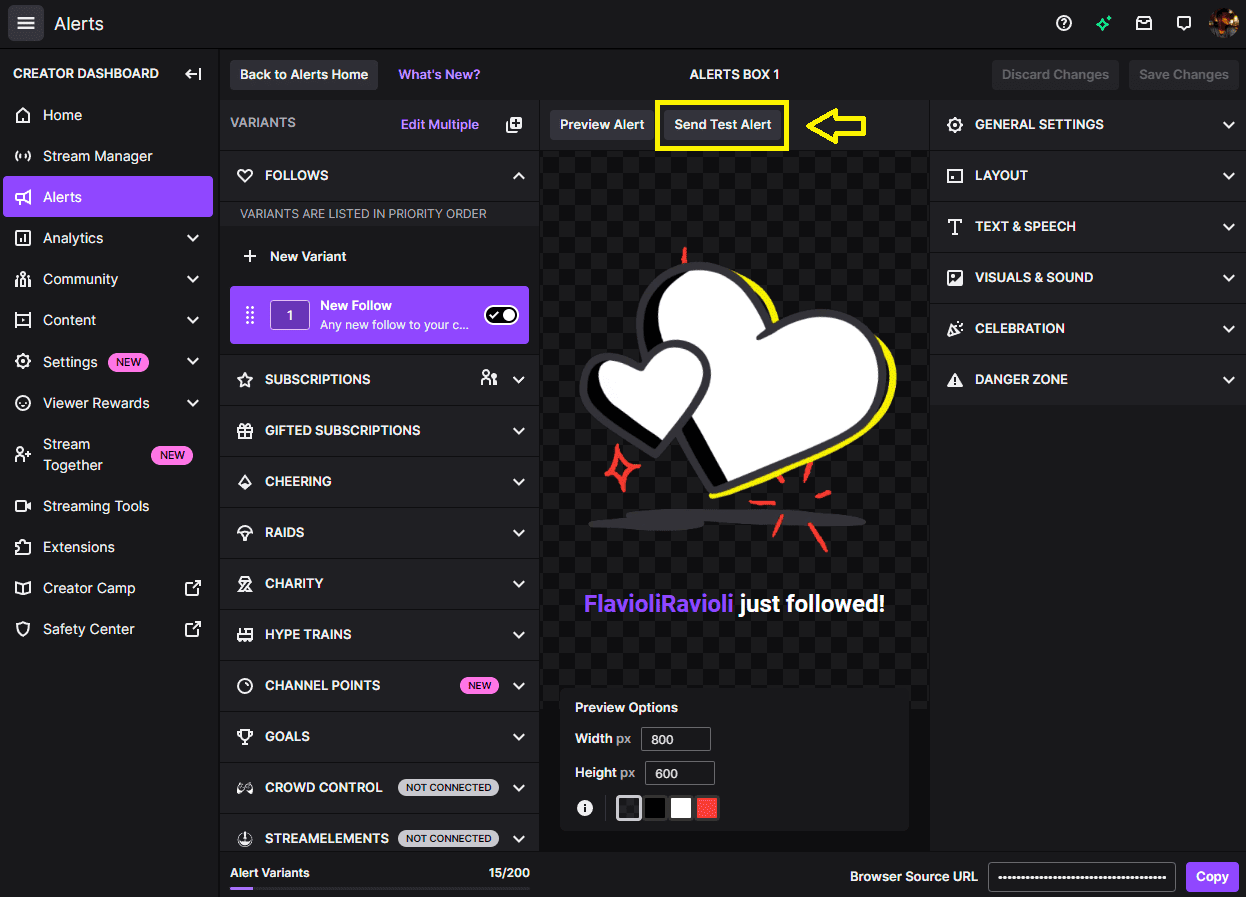
- Check OBS for Alert: Switch to OBS/Streamlabs to find a sample alert in motion. If done correctly, you’ll see and hear the follower alert in OBS/Streamlabs.
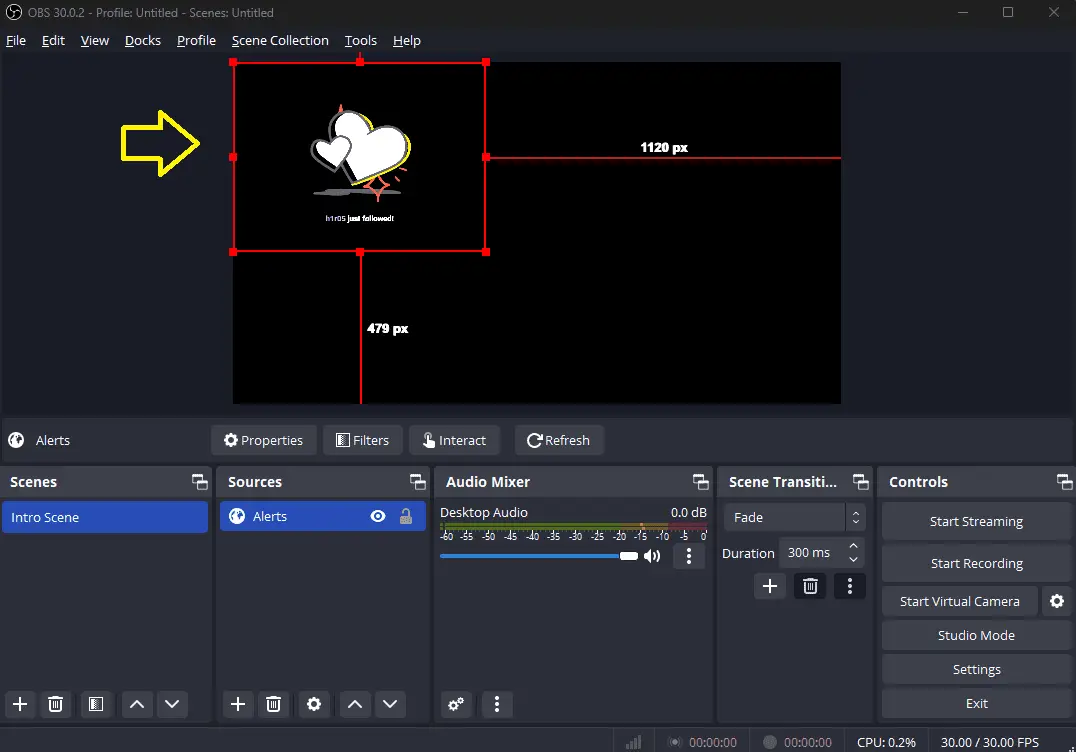
- Prioritize the Alert Browser Source: Copy the ‘Alerts’ source in all your scenes, so that you don’t miss any alerts when you change your scene. Ensure it’s at the top of the source list in OBS/Streamlabs for visibility.
If you have followed the steps correctly till now, you are done setting your Alerts in under 10 minutes. Nice yeah!
But, the alerts would have just the default graphics and kind of look mediocre at best. You should now look at customizing your alerts to get that edge over others and make it more interesting for your followers.
5. Customize Alerts for New Followers
- Customize Follower Alert: Go to the ‘Follows’ tab and click on ‘New Follower’.
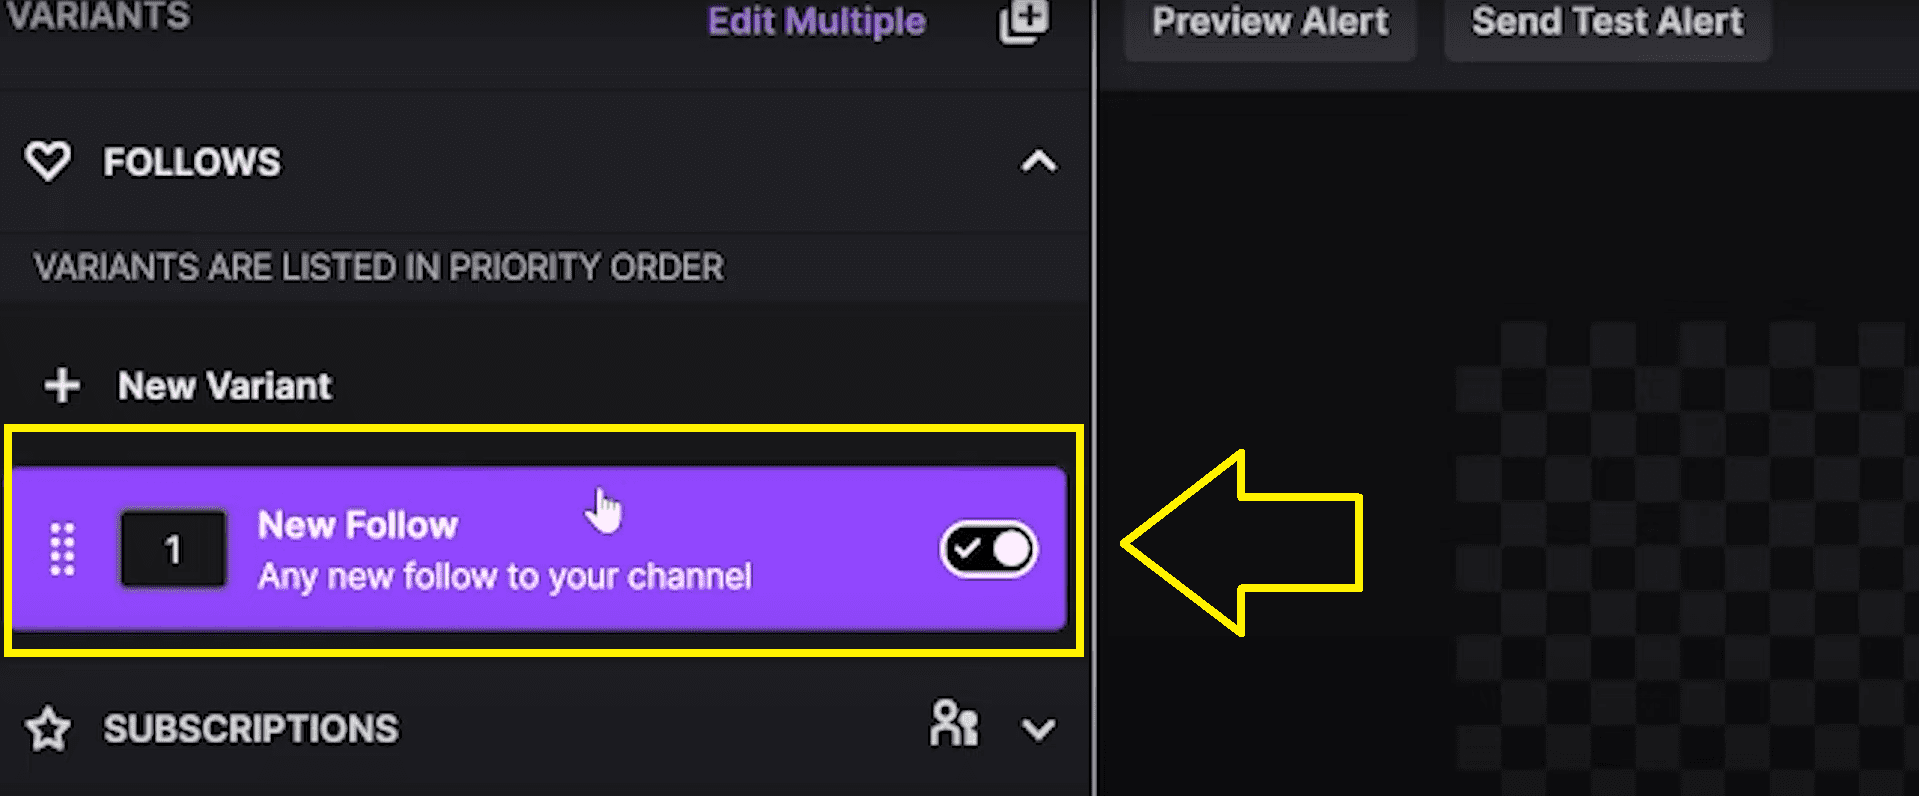
- Upload Visuals and Sounds: Directly head over to the right side under the ‘Visuals and Sound’ section to upload any custom gifs that you want to use.
- In case you are new, Twitch will ask you to verify your phone number to upload any image
- ‘Add Phone Number‘ and Acknowledge Twitch’s Policies for Terms of Service and Community Guidelines
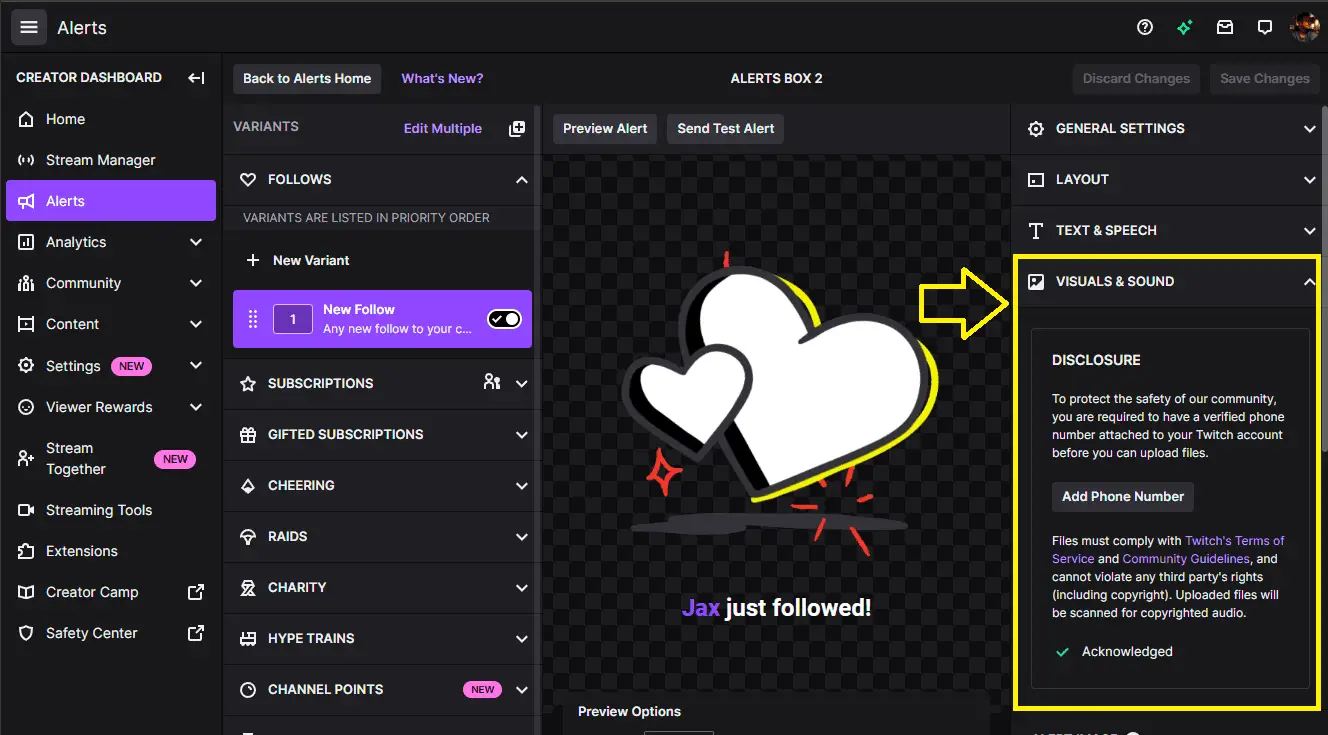
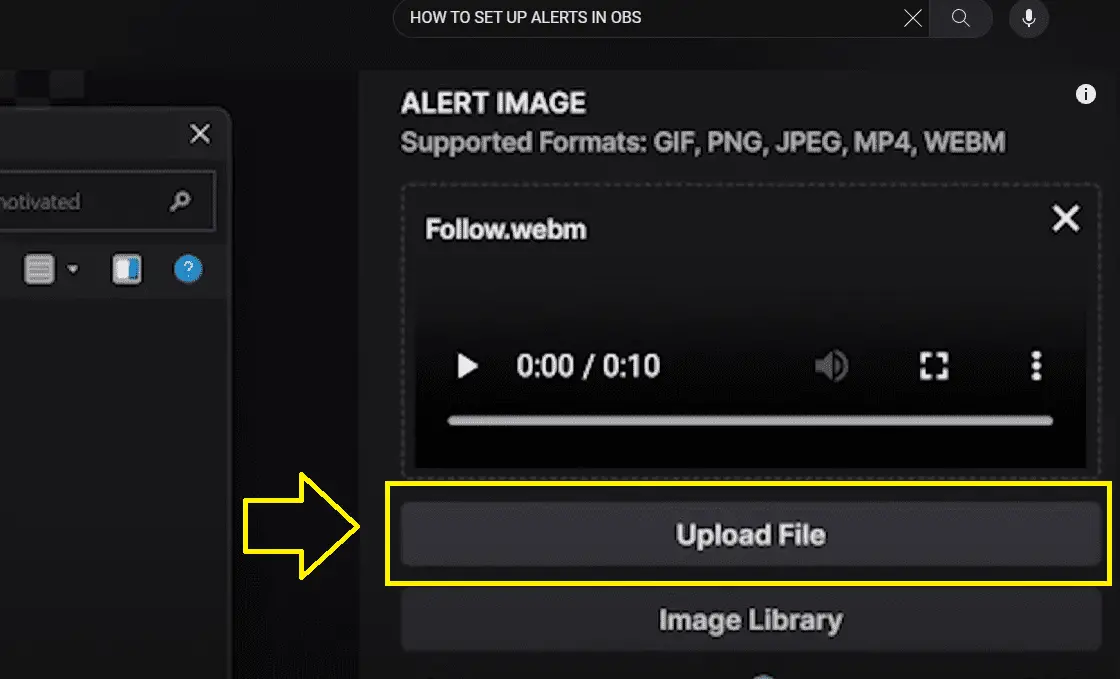
- Upload Custom image: Click on ‘Upload File’ in ‘ALERT IMAGE’ and select your custom alert
- Repeat the same steps to upload your custom sound in the ‘ALERT SOUND’ section
- Adjust the custom image scale and custom sound volume
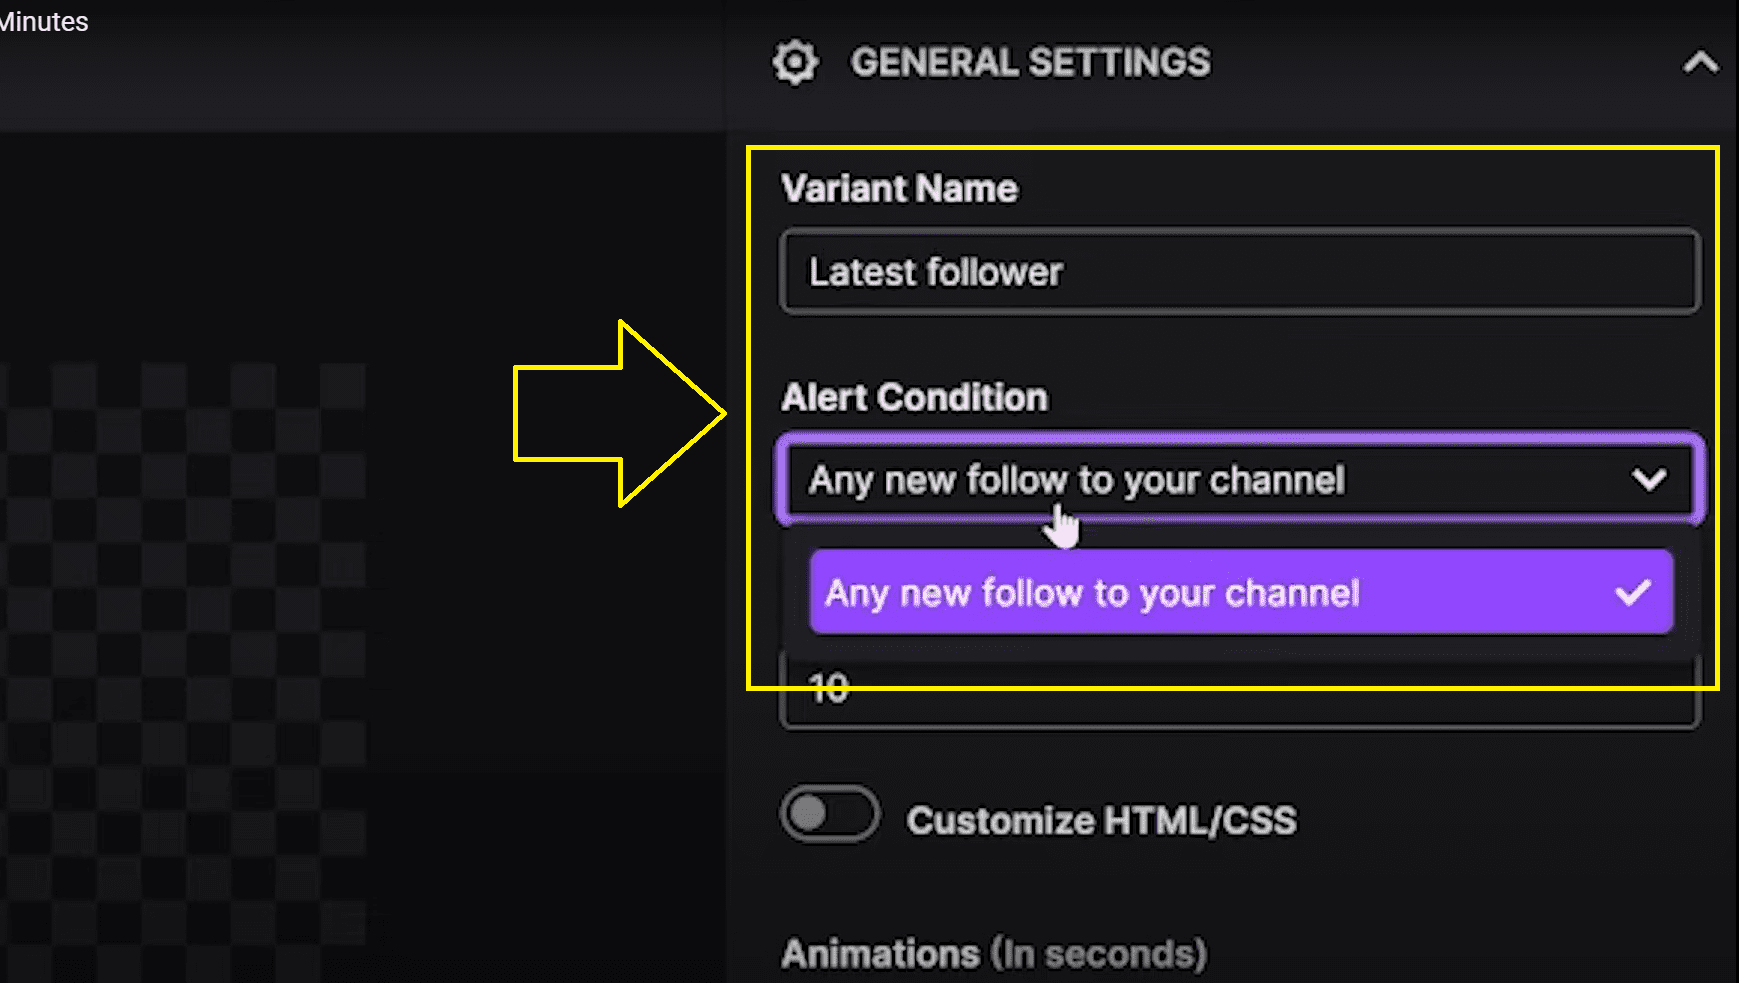
- General Settings: Head over to the ‘General Settings’ where you can change the variant name, alert conditions, duration, and animations.
- Give any name like ‘Latest follower’ to the alert variant. Make sure its recognizable later
- Provide an ‘Alert Condition‘ when the alert will pop up like ‘Any new follow to your channel’ which will give you an alert every time you get a new follower
- Set the Duration: Adjust the duration (in seconds) of your alert, make sure it matches your animation length.
- If the duration does not match your alert animation duration, then the animation might go into a loop or be cut abruptly
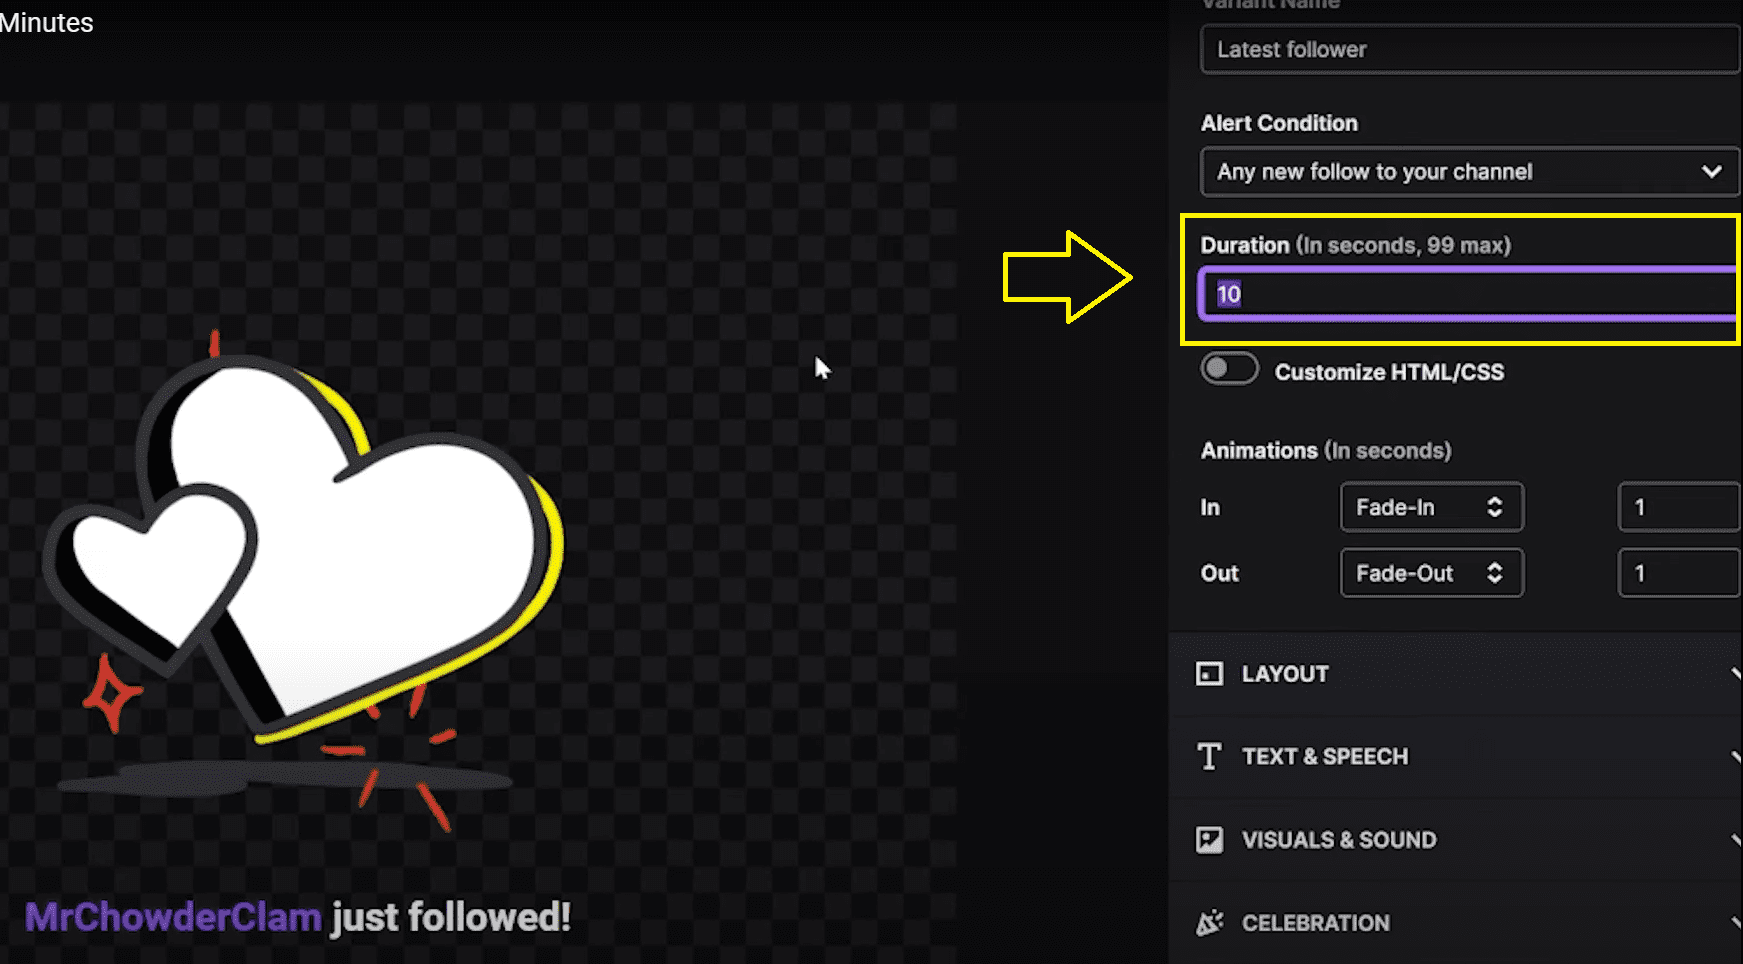
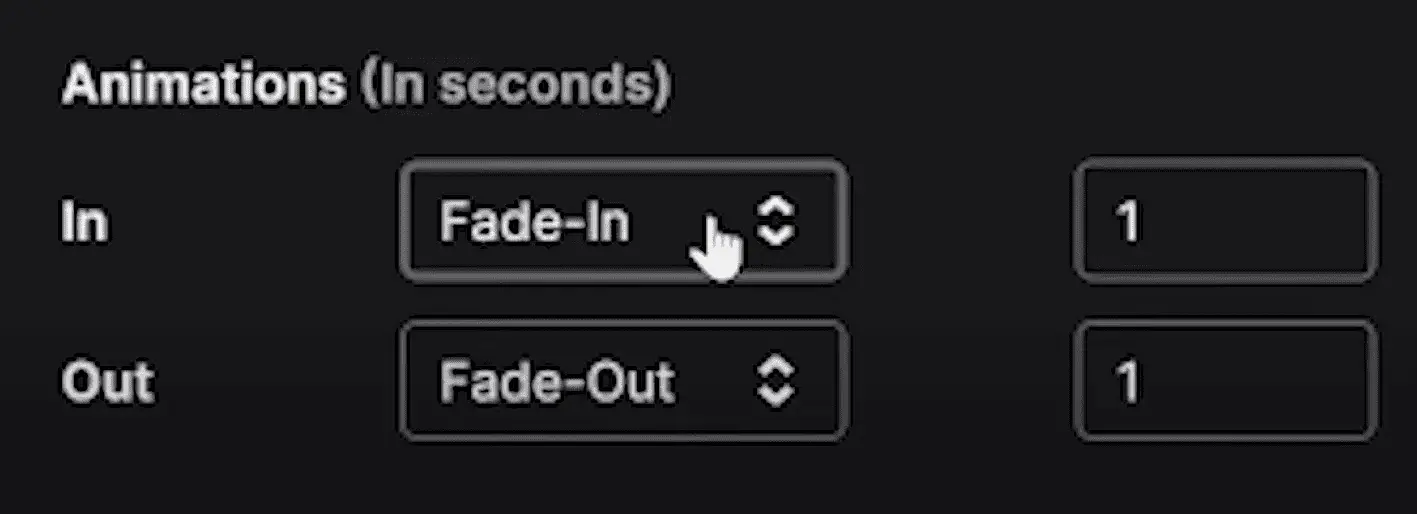
- Adjust Animation: Change the animation type e.g. ‘Fade-In’, ‘Fade-Out’ which will change how the animation would behave when appearing and disappearing
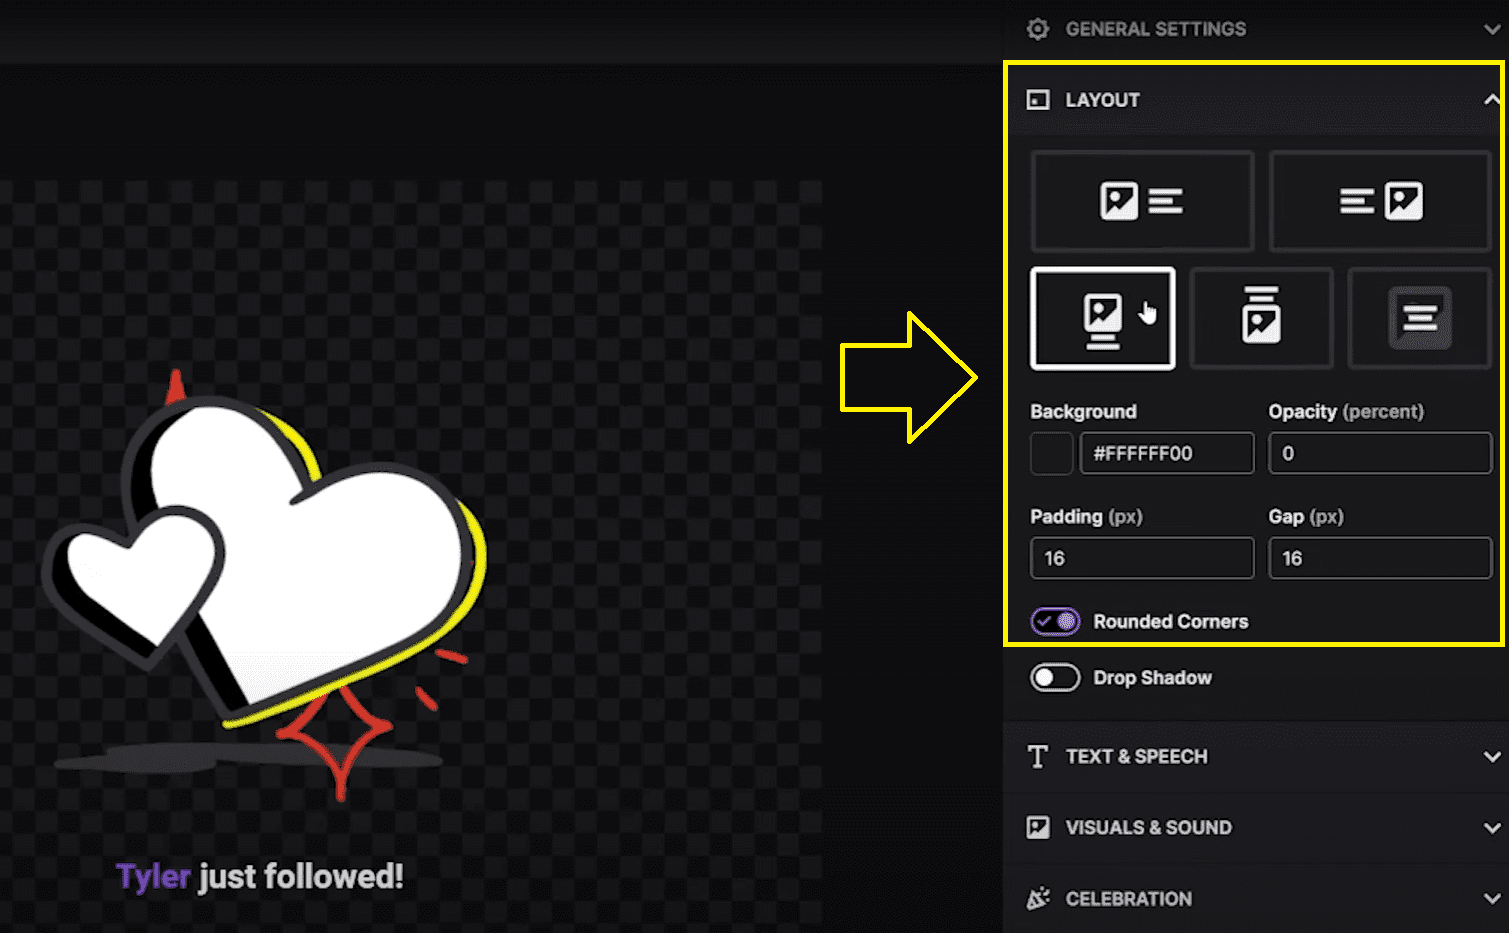
- Change Layout: Head over to the layout section, adjust the layout of your animation and your text
- You can choose different options how your text would appear like under the animation, over it, inside the animation etc.
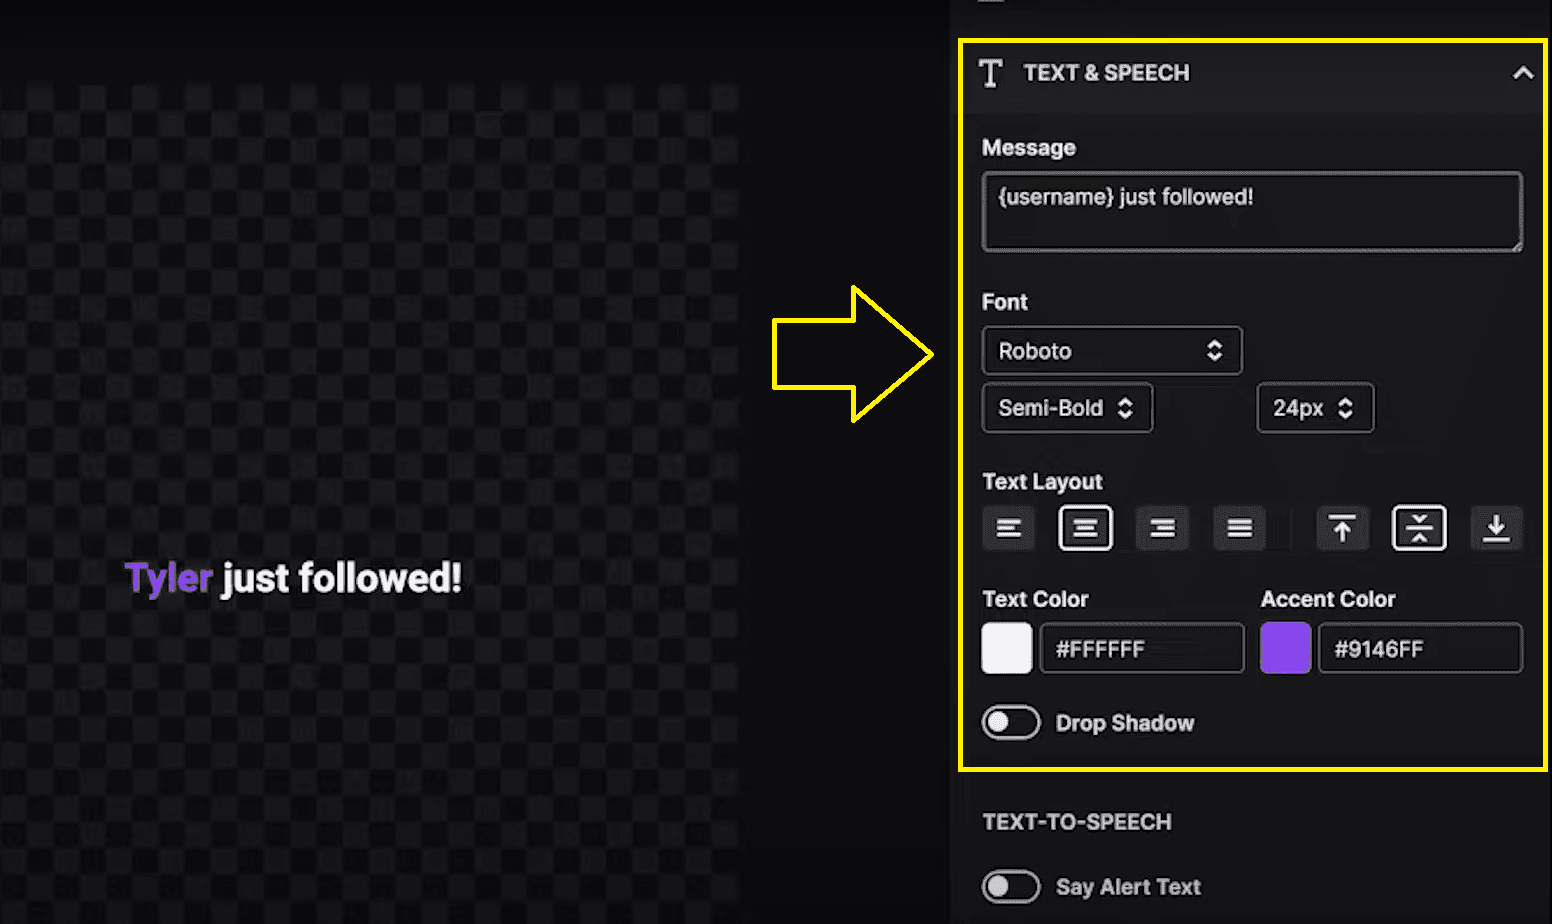
- Change the message and font: Adjust the message that will appear for your alert, like ‘{username} just followed or ‘{username} just joined the army etc.
- Change the appearance of the text by adjusting the font, text and accent color
- Experiment with the font type and sizes to find your perfect fit
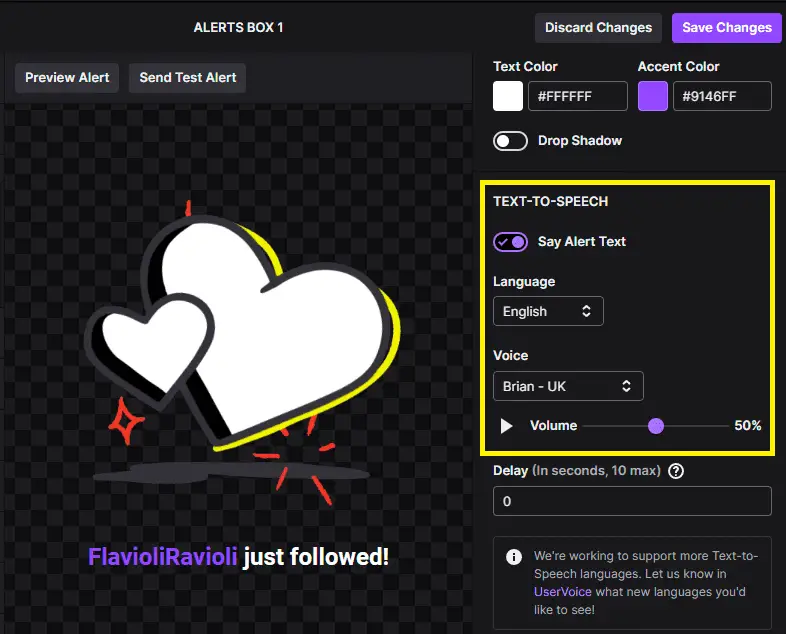
- Enable Text to Speech: In case you want a voice to read out the follower alert, enable ‘Say Alert Text’
- Select the language and voice type from the drop downs and adjust the volume
- Experiment with the voice over tone and volume to achieve the right results
- Read aloud Cheer Message (Optional): In case you are adding an alert for Cheers and want the cheer message to be read aloud, go to the ‘Cheering’ section and enable the ‘Say Cheer Message’ under Text to Speech
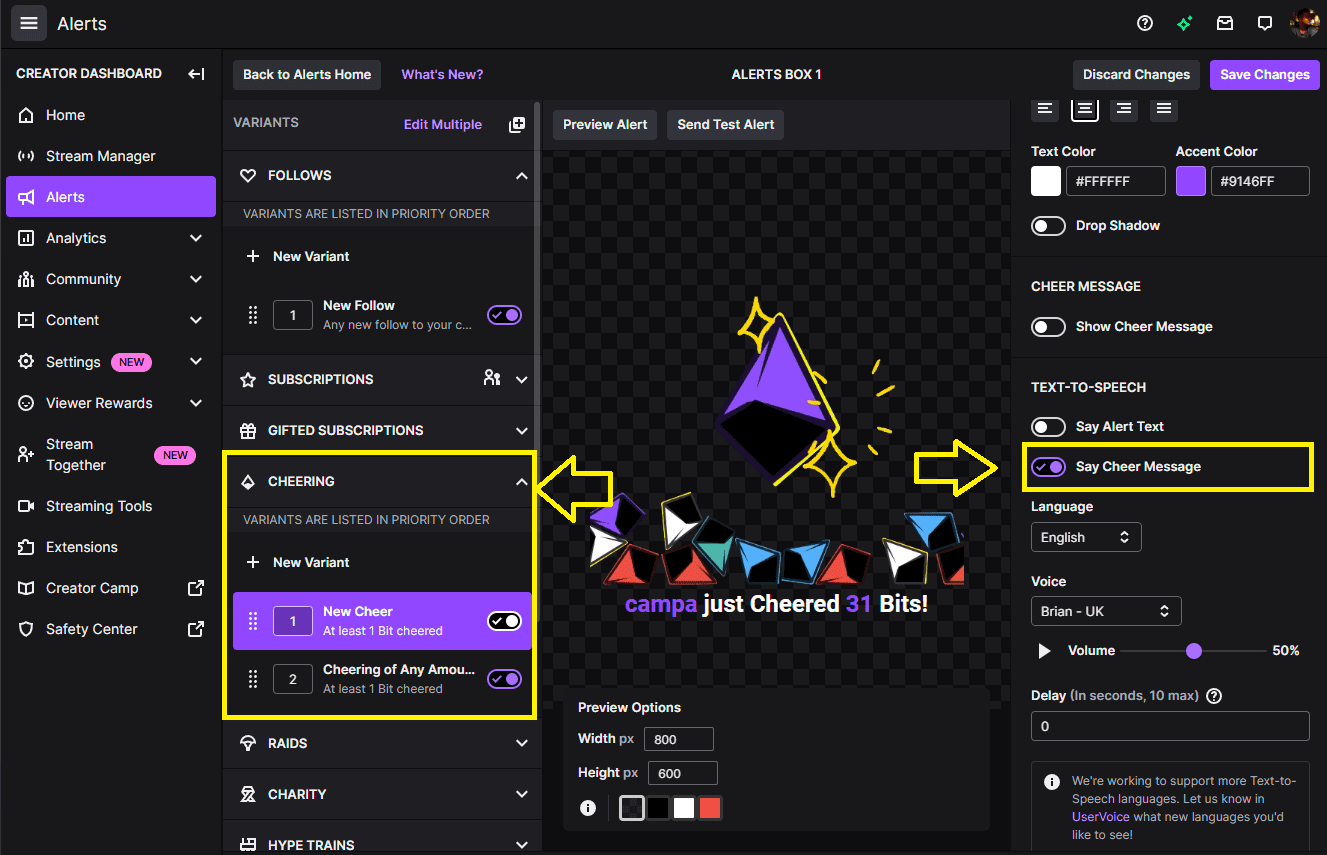
- Don’t forget to hit save to enable all your settings
Related Article: 7TV emotes for Twitch and YouTube
6. Set Up Alert Variations
Before setting up a variation, lets understand what is a variation.
What is a Variation in Twitch Alerts?
Variations allow streamers to design unique and diverse responses for different viewer interactions. For instance, a streamer can set up one type of alert for a new follower and a completely different alert for someone who donates a certain number of bits. This customization adds an element of surprise and personalization to the stream, enhancing viewer engagement.
Now lets follow the below steps to set up a twitch variation.
- Choose Alert Type: Identify which alert you want to create a variation for, such as Follows, Subscriptions, or Bits.
- Duplicate an existing Alert: Duplicate an existing Alert and rename it to reflect the specific action or threshold, like ‘Cheering of 100 Bits’.
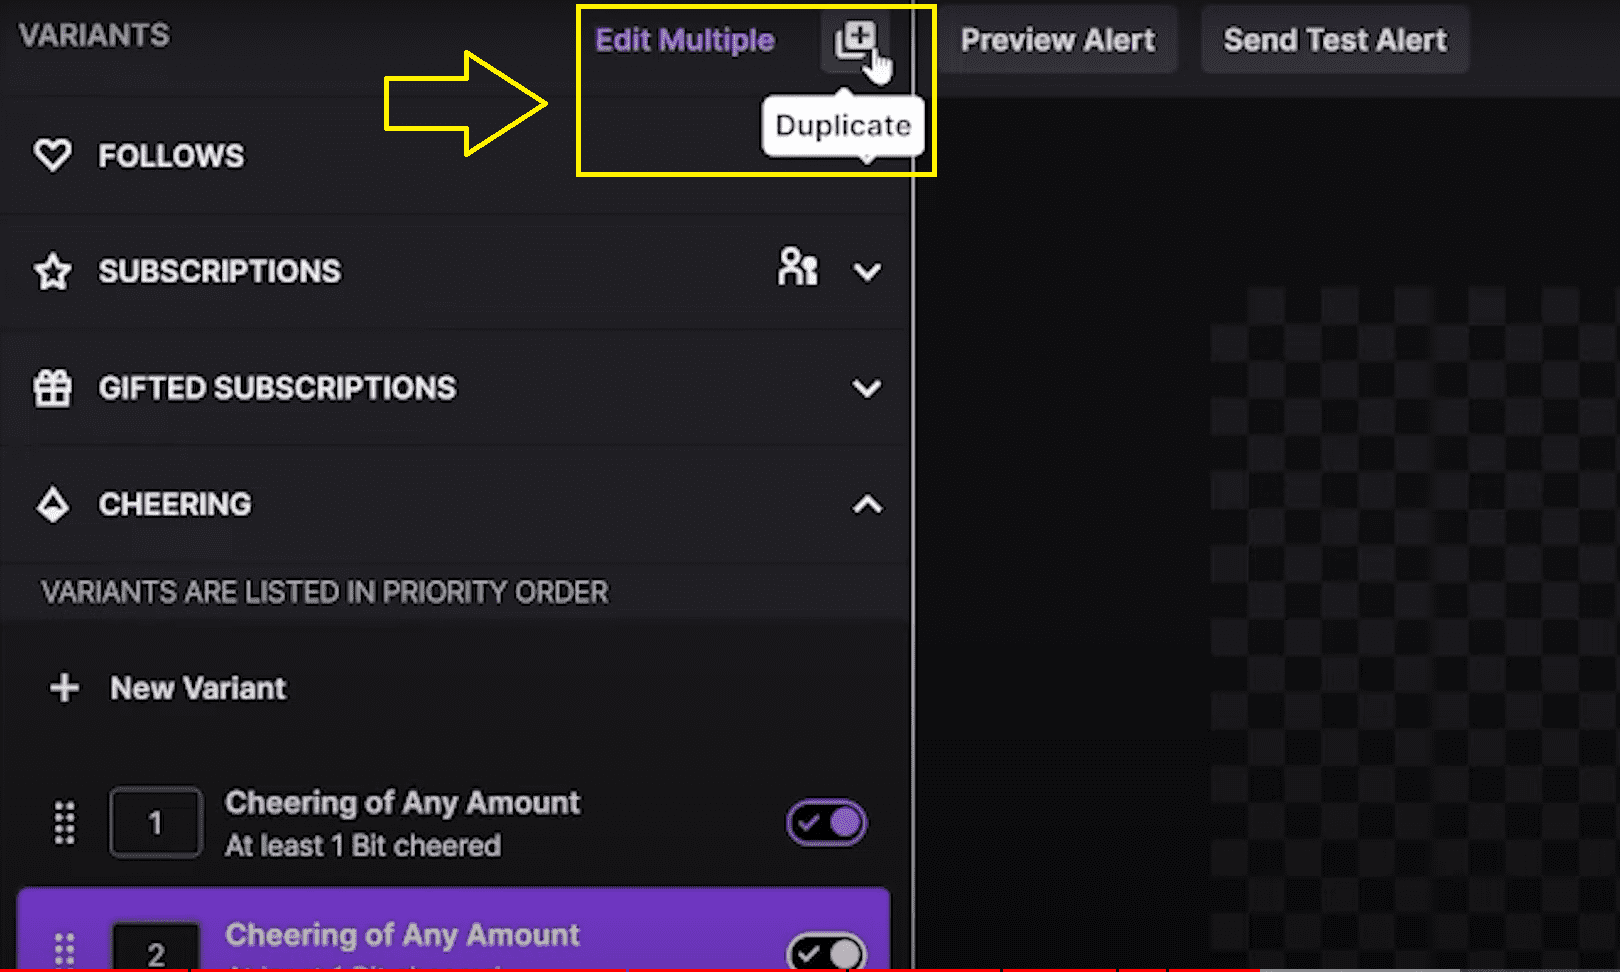
- Rename the Alert Variant: Change the variant name to its purpose to recollect it easily later when required, such as ‘Cheering of exact 100 Bits’
- Set Alert Conditions: Set specific conditions that will trigger this variation, such as ‘Cheering of exact 100 Bits’. Choose conditions like ‘Cheered exactly’ and set the Bits amount as 100.
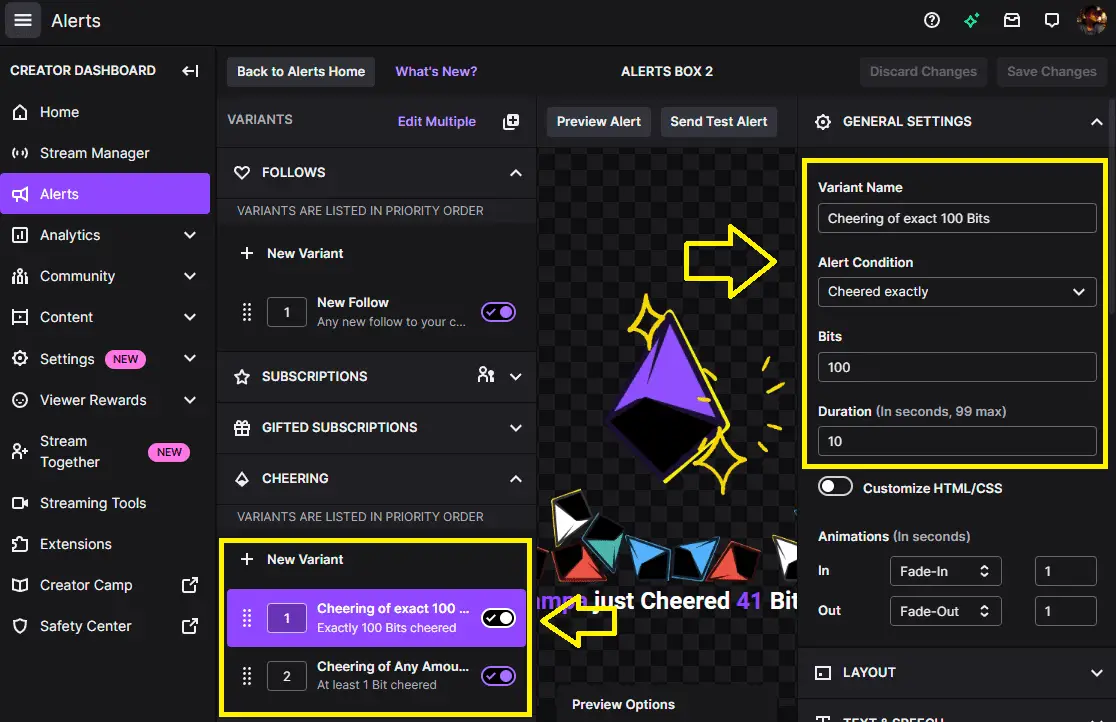
- Customize as Required: Tailor the message, visuals, sound, and even text-to-speech settings to align with the nature of the variation, as shared in Point 5 of the article
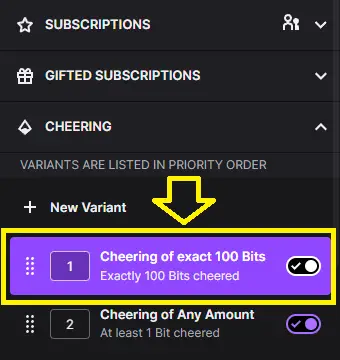
- Prioritize Variations: Move the new alert to the top of the list for priority in triggering
- In Twitch’s alert system, variations are executed based on priority from top to down
- Hence if ‘Cheering of Any Amount’ alert is at the top, it will trigger for any bit amount
- However, if ‘Cheering of exact 100 Bits‘ alert is placed higher in priority, it will be the one to activate for a 100-bit cheer, making the alerts more specific and tailored.
- In Twitch’s alert system, variations are executed based on priority from top to down
7. Set Up Hype Train Alerts
Hype Trains on Twitch are activated when viewers participate in rapid succession through subscriptions, gifted subs, or bits. These moments create a sense of urgency and excitement, encouraging more viewers to join in. Setting up alerts for Hype Trains adds a visual and auditory cue, amplifying this electrifying atmosphere.
- Locate Hype Train Settings: As explained in Point 2, find the ‘Hype Trains‘ section in your Alerts Dashboard settings
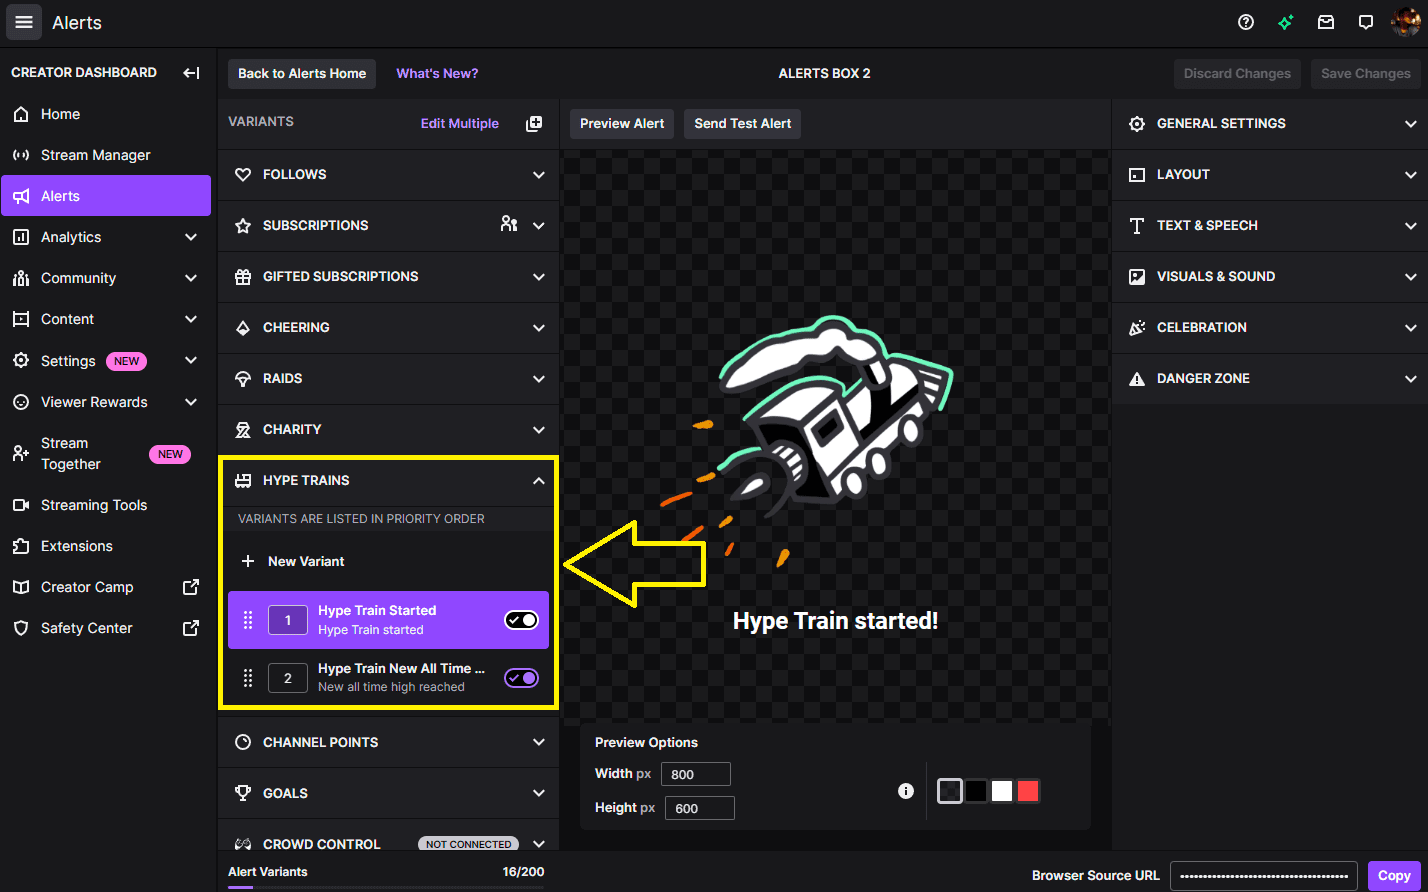
- Customize Hype Train Alerts: Tailor the Alerts to match the style of your stream. You can set up alerts for when a Hype Train starts, reaches certain levels, or hits an all-time high.
- Choose Visuals and Sounds: Select appropriate graphics and sounds that resonate with the energy of a Hype Train. Vibrant and dynamic visuals, and energetic sound effects work best.
8. Set Up Goal Alerts
Goal Alerts are another engaging feature. They can be set for Follower counts, Subscription goals, or Fundraising milestones. Reaching these goals is a significant event, deserving special recognition.
- Locate Goal Settings: Find the ‘Goals‘ section in your dashboard settings
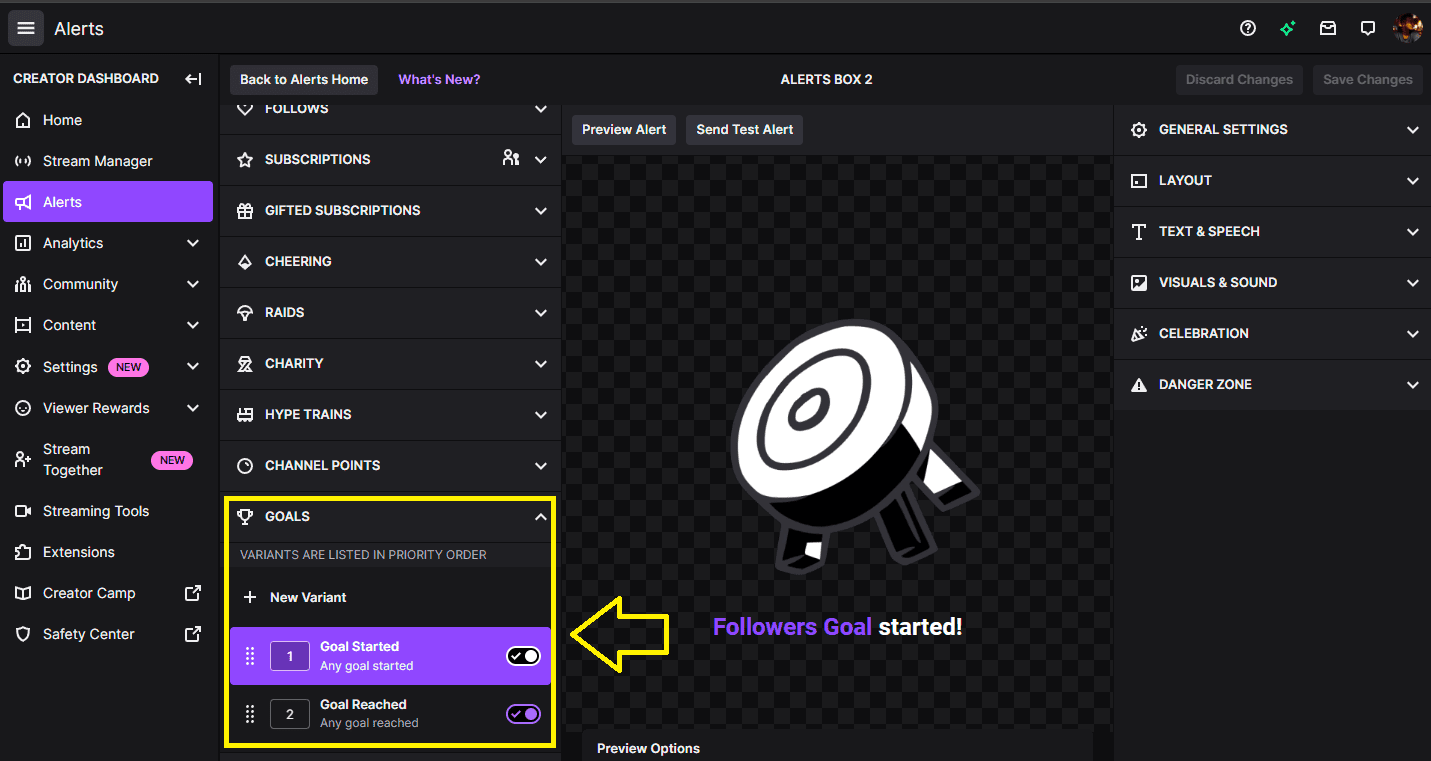
- Customize Your Alerts: Design alerts that will activate upon starting, progressing, and achieving these goals. Ensure these alerts are distinct and celebratory to mark the achievement.
- Incorporate Interactive Elements: Consider adding interactive elements like viewer shout-outs or special animations to make achieving goals a shared celebration.
9. Add Celebrations with Emotes
Celebrations with Emotes bring a visual party to your stream. When certain events occur, like achieving a goal or receiving a subscription, Emotes explode, dance, or float across the screen, creating a festive and vibrant atmosphere. This not only celebrates the moment but also visually captivates your audience.
Here’s how you can set these up in your Alerts Dashboard:
- Choose an Alert for Celebration: Decide on which alert you want to trigger for the celebration. It could be for Goals reached, New Followers, or Donations.
- Enable Celebration Feature: In the alert customization settings, you’ll find an option for celebrations. Toggle it on
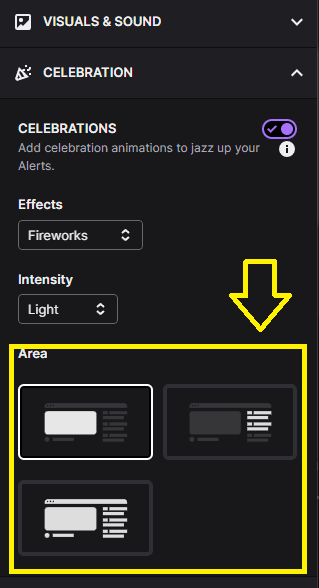
- Select Emotes and Animation Style: You can use your custom Twitch emotes or default options. Choose an animation style that fits the mood of your stream – from subtle fireworks to extravagant flamethrowers.
- Choose Display Options: Customize how pronounced you want the celebration to be and where it should appear – over the video, chat, or the entire browser window.
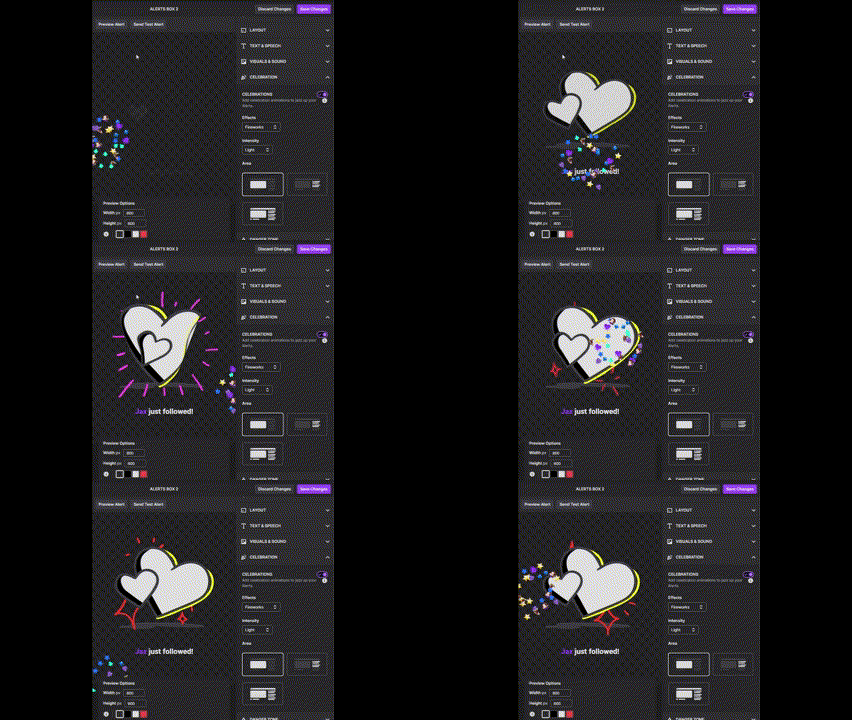
- Balance Celebration Intensity: Avoid overusing celebrations to prevent viewer annoyance.
- Viewer-Side Display: Remember, celebrations appear in the viewer’s browser, not in your OBS footage.
Best Practices for Alerts
- Add Browser Source to All Scenes: Ensure the alerts appear in all the scenes you’re using
- Alert Frequency and Volume: Set your alerts to a reasonable volume and frequency. Too many loud alerts can be overwhelming for viewers. Be mindful that alerts that could be problematic for sensitive viewers
- Avoid Overloading: Too many alerts can overwhelm and distract your viewers. Find a balance that maintains excitement without being intrusive
- Streamline Alerts with Your Content: Position alerts in a way that they do not obstruct important content on your stream
- Make Alerts Interactive and Personal: Use alerts to acknowledge and thank your viewers for their contributions, making them feel valued and part of your community
- Align Alerts with Your Channel’s Theme: Ensure your alerts match the visual theme and tone of your channel. Consistent branding helps in creating a cohesive viewing experience
- Experiment and Adjust: Feel free to tweak settings to suit your stream’s style
- Keep Alerts Updated and Fresh: Change your alerts periodically to keep your content fresh and engaging
By following these steps, you can have a fully functional and customized Twitch alert system set up. These alerts will enhance viewer interaction and add a professional touch to your stream.
In Closing: Have Fun with your new Alerts!
Setting up follower alerts on Twitch using OBS is a great way to engage with your audience and enhance your streaming experience. Remember, the key is to be creative, responsive to viewer feedback, and consistent in your streaming journey, while having fun!
Happy streaming!
